Introduction
This manual contains information about your Pole Voima E-bike, its use and maintenance. Study this manual carefully to get the best out of your bike.
Following symbols are used to highlight important information in this manual:
| WarningHazardous situations that can lead to a serious injury or even death. | |
| CautionPotentially hazardous situation that can lead to an injury. | |
| NoticeImportant information that requires special attention. | |
| Electrical RiskWarnings related to risks with electric shocks or short circuiting. | |
| TipUseful tricks to help you with setup or riding. | |
| Chemical InfoDetails on grease or other chemicals to be used. |
© 2023 Pole Bicycle Company Oy
No part of this publication may be copied, edited, distributed or used without prior written consent by Pole Bicycle Company Oy. All rights and rights to changes are reserved.
Safety
| This chapter contains critical information to keep you safe. Please read it carefully! |
Keep this manual for your reference. In addition, it is critical that you consult Pole Bicycles and component manufacturers’ instructions where indicated. A professional mechanic should only perform specialist tasks..
Bicycle Safety
Please adhere to all torque and sizing specifications for press fits and thread fits. Over-tightening can damage threads or cause parts to fail. Using the wrong size part can also cause parts to fail and cause an accident, resulting in severe injury and/or death.
As with all mechanical components, a bicycle is subjected to wear and high stress. Different materials and components may react to wear or stress fatigue differently. If the designed life of a component has been exceeded, it could fail and cause an accident, resulting in severe injury and/or death. Conversely, cracks, scratches, dents, delamination, unusual noise, or a change of coloring may indicate that the component’s life has been reached and should be replaced before riding.
In the event of an impact or crash, damage to composite components or the frame may not be visible to the user. Therefore, we recommend you consult Pole Bicycles or your professional mechanic immediately for an inspection. Your bicycle requires regular maintenance, frequent inspection, and the replacement of parts to address any issues. After any crash or impact, or if you have exceeded the maximum weight limits, please immediately contact your professional mechanic for inspection.
Do not expose your bicycle to temperatures above 65°C (150°F). High temperatures, such as an open flame and other heat sources, may damage the adhesive that holds frame parts together.
Do not attempt to repair a damaged frame. It is impossible to predict how forces from a crash or impact have damaged the frame or parts. Fixing a frame could compromise your safety and will void the warranty.
Do not place your hands near a moving drivetrain. The areas where the chain contacts the front and rear sprockets or derailleurs can trap fingers and hands. Do not place your hands near a moving wheel. A moving wheel can catch your hand between the spokes and frame or other components and can crush your hand. Do not place your hands near sprocket teeth or disc brake rotors, which have sharp edges and cut skin.
Regularly check your brakes, tires, steering, rims, and other parts. Be aware of impaired traction and braking distances in wet or dusty conditions.
Do not tamper with the electronic systems, tire size, or sprocket sizes. Tampering can increase the risk of hazards and make the bike illegal in most locations. Additionally, Pole Bicycles Company does not take responsibility for modified systems.
Never ride or transport your Voima without the battery compartment being covered.
Riding Safely
Obey all local laws with CPSC or CE safety standards. Failure to wear a helmet when riding may result in serious injury and/or death.
Watch for hazards while riding, such as potholes, railroad tracks, cattle guards, debris, or variations in the road surface. These hazards can damage wheels and tires or cause you to lose control of your bicycle and crash, which could result in severe injury and/ or death.
Use a proper front and rear lighting system and reflectors for riding in poor visibility or low light conditions, such as fog, dusk, dawn, or nighttime. Reflectors alone are not sufficient for riding a bicycle in these conditions. Failure to use a proper lighting system and reflectors in these conditions could prevent you from seeing and could prevent you from being seen by other people. Failure to use an appropriate lighting system or reflectors in these conditions is hazardous and may result in severe injury and/or death.
Challenging conditions, such as wet, muddy, snowy, or loose surfaces, will impair traction, steering, and ability to brake. In challenging conditions, the risk of a crash is dramatically increased and can lead to severe injury and/or death.
Watch for “toe overlap,” which is when your foot contacts the front wheel, tire, or fender as you turn the bicycle at slow speeds. Foot overlap can cause you to crash, resulting in severe injury and/or death. Test your equipment at slow speeds without pedaling to ensure your foot has clearance during slow speed turns. Check for toe overlap each time you change your cranks, shoes, pedals, or tires.
Mountain biking and road riding is inherently dangerous activity and can result in injury even at slow speeds. Stunt riding, jumping your bicycle, riding at high speeds, lift-access, racing, and other types of extreme riding are considered extremely dangerous and increase your risk of injury and/or death. Even with the most advanced safety gear, you could become seriously injured or killed when stunt riding, jumping, riding at high speeds, or competing. To decrease your risk of injury, know your limits, use your bicycle correctly, and always wear an appropriate helmet style and safety gear.
Warranty
Voima Frame Warranty
Pole Bicycle Company Oy will repair or replace at its option and discretion, any CNC frame or CNC part made by Pole Bicycle Company Oy we determine to be defective in materials or workmanship. The warranty will be in effect for 5 years (60 months) but not limited to the original owner.
E-Bike Components Warranty
BOSCH E-BIKE GLOBAL SERVICE NETWORK
Bosch offers service and support for all E-bike products within the following regions;
EU27 – Austria, Belgium, Bulgaria, Croatia, Republic of Cyprus, Czech Republic, Denmark, Estonia, Finland, France, Germany, Greece, Hungary, Ireland, Italy, Latvia, Lithuania, Luxembourg, Malta, Netherlands, Poland, Portugal, Romania, Slovakia, Slovenia, Spain, and Sweden. Norway, Switzerland, Australia, New Zealand, United States of America, Canada, Japan, Great Britain, South Korea
All warranty issues, services concerns, and motor and battery support should be raised with an accredited Bosch Service Dealer or Expert. Details on specific geographical service support can be found at https://www.bosch-ebike.com/en/service/dealer-search.
SERVICE AND WARRANTY LIMITATIONS OUTSIDE OF THE GLOBAL REGIONS LISTED ABOVE Outside of the Global Regions listed above, customers must contact Pole Bicycles directly in the event of a Bosch Service inquiry. All Pole Bicycle customers outside Global Regions with Bosch E-bike motor equipment fitted to a bike must contact us via the Pole Contact Support Page https://polebicycles.com/contact/contact-support/
PLEASE NOTE – Outside Global Regions (listed above), Pole Bicycle Company Oy will only provide service or warranty support for Bosch motor components (not batteries). Outside Global Regions, Battery components and PowerTube units are NOT covered under the Pole Bicycle Company Oy Bosch Service or warranty Support.
All motor items returned to Pole Bicycle Company Oy for inspection and diagnosis, including return shipping, will be done at the customer’s own risk and expense.
Parts Warranty
Pole Bicycle Company Oy will repair or replace at its option and discretion, any component or part not made by Pole Bicycle Company Oy we determine to be defective in materials or workmanship. The warranty will be in effect for 1 years (12 months).
Warranty Terms
We, Pole Bicycle Company Oy, warrant that we shall, according to the terms of this limited international warranty, repair, or a service point authorized by us shall repair, any material or manufacturing defects for the original customer, subject to our discretion either by:
- Repairing the product or its part,
- Replacing the product or its part with a new or serviced replacement product or part, which may be a similar successor model product or part and possibly of a different color than the replaced product or its part,
- Refunding the purchase price of the product.
Pole Bicycle Company Oy will at their sole discretion, make the decision themselves as to which option to pursue and implement in the case of a valid and clear warranty. In the event that option C is deemed the most appropriate solution, Pole Bicycle Company Oy, reserves the right to offer a reasonable amount or percentage of the market value of the frame or component, in light of its use, condition, and fair and reasonable maintenance of the duration of its use. In the above situations, we will cover reasonable shipping costs.
The consumer shall have the rights according to the national legislation. This warranty shall not limit the consumer’s rights under the valid national legislation, nor the rights based on purchase agreements or sales contracts with respect to the seller. Should a product or its part be replaced or the agreed price of the product be refunded to the consumer, the ownership of the replacement product or its part shall be transferred to the consumer, and the ownership of the replaced or returned product or its part shall be transferred to Pole Bicycle Company Oy. We shall grant the replaced product or its part or the repaired product a warranty which corresponds to the remaining period of warranty of the original product. Utilizing and applying the warranty may require the consumer to answer questions by means of which we will attempt to identify possible problems or defects relating to the product. Our warranty does not cover product assembly or installation work or costs or possible additional costs incurred by model changes.
Limited Warranties Do Not Cover
- Normal wear or cosmetic damage such as scratches, dents, hollows, corrosion, impressions, and abrasions
- Defects caused by careless and poor handling
- Damage caused by incorrect care, overloading, negligence (for example, insufficient maintenance of bearings or suspension components) or accidents, such as falling over, colliding, falling, fire, or being crushed
- Changes made to the product, such as engravings, painting, or changes to the frame and defects and damage caused by these
- Wearing parts such as wheel tires and shafts; unless the damage is due to a material or manufacturing defect
- Damage caused by maintenance measures carried out by a party other than Pole Bicycle Company Oy or a service point recognized and authorized by us
- Damage caused by lack of fair and reasonable maintenance measures carried out during the duration of the warranty period
- Products bought second-hand, unless the local legislation prescribes otherwise
- Defects due to normal wear or to another normal and reasonable aging of the product
- Professional or commercial use; such as using the product in competition or commercial activities and the defects or damage caused by that
- Defects, damage, or personal injury caused by extreme stunts or attempted extreme stunts comparable to competition activities
- Personal injury to the rider as a result of any of the aforementioned above warranty exclusions
- Excessive strain caused by incorrect fitment of third party components, use or miss handling
- Damage to the electrophoretic coating or adhesive by use of high heat on the frame.
We do not warrant the compatibility of the product with products and spare parts provided by third parties (from other manufacturers). This includes, but not limited to; incorrectly tuned shocks, excessive shock spring rate, and an under or overdamped shock.
We reserve the right to reject warranty claims concerning products that have been acquired and/or used contrary to the national laws of the consumer’s home country. This warranty is limited to countries where we sell or market the product ourselves or through authorized retailers.
Limitation of Liability
We will not grant any warranties to the user instructions of the product or to the unusual use of the products described in the user instructions.
We shall not, under any circumstances, be liable for secondary, special, indirect, occasional, direct or consequential damage, losses or expenses or the inability to use the product, which arises from the product or may be connected to the product, irrespective of whether they are due to the misuse, incorrect use, corrosion damage, incompetent use or defect of the product. The above limitations may not concern all consumers if any state does not or states do not allow the exclusion or limitation of secondary or consequential damage.
We reserve exclusive rights to decide whether:
A. The product will be repaired,
B. The product will be replaced by a new or serviced product, or
C. The purchase price or part thereof will be refunded.
One of these compensations is the only legal remedy obtained by the consumer under the limited international warranty granted by us. The decision pertaining to the validity and the actions taken in the event of a legitimate limited warranty, remain the sole discretion and decision of Pole Bicycle Company Oy.
We shall not be liable for anything caused by the products of third parties (for example other manufacturers) to our products. We shall not be in any way liable for the functioning or malfunctioning of the products or services of third parties (for example other manufacturers), of their usability in connection with our products, or for the safety of a product or service of a third party, nor are we liable for anything else caused by a product or service of a third party or related to these.
Warranty Process
Please fill out our service form at https://polebicycles.com/contact/contact-support/ or contact us at helpdesk@polebicycles.com or by telephone at +358 50 307 1239
Technical Information
Voima E-Bike
More is More™ A principle that we strongly believe in at Pole Bicycles. Our ethos is held firmly in function before form and form follows function. The Pole Voima (meaning Power in Finnish) is all of these principles coming together.
The idea behind the Voima is simple; Ride up, along, and down faster. We worked hard to create a bike with better-pedaling efficiency that had longer travel, the assistance of a motor, and a long lasting battery range. It’s all about maintaining power transfer from our pedal motion to trail speed mechanically, not only from the assistance of the motor, and with the right suspension kinematics. Our modern suspension design allows us to make the most of pedaling efficiency without a loss of energy. Because of this, the Voima is the ultimate enduro, park bike, long-distance trail rig, and DH play bike all in one.
The Voima has more power, more travel, and it can cover a greater distance. Sourcing the latest technology, we were able to create a bike that didn’t weigh over the odds and has more range and suspension travel. There are no compromises in terms of suspension kinematics, geometry, or how the bike rides either. Based on a completely new suspension platform – a design that has been tested across both bikes with and without a motor and battery. It has proven to be lively and active but without compromising on pedaling efficiency or suspension dynamics. With 190mm travel front and rear, the Voima is also the only completely CNC machined and bonded 7075-T6 aluminum-framed e-bike in the world. The Voima frameset is also dual crown compatible. Race tested and approved, the Voima has been awarded the EFBE TRI-TEST® Cat-5 DH through stringent testing in Germany.
EFBE TRI-TEST®
The Voima E-bike frame has been tested by EFBE Prüftechnik GmbH in Germany. It has passed the EFBE TRI-TEST® GRAVITY Cat-5 (Downhill strength rating) – a test designed specifically for gravity bikes. The test consists of the following;
-
- Pedaling Forces Fatigue Test
-
- Vertical Force Fatigue Test
-
- Head Tube Fatigue Test
-
- Brake Load Fatigue Test
-
- Rear Axle Load Fatigue Test
-
- Lateral Load Fatigue Test
-
- Maximum Load Test Pedal Load
-
- Maximum / Overload Test Jump/ Drop Load
Identification
All Voima framesets have the following engraved information
 POLE BICYCLE.COM – POLE VOIMA 2022 – MAX TOTAL WEIGHT 150 KG – 250 W – 25 KMH (US/CAN 20 MPH) – CATEGORY 5 – EN 15194 / EN 17404 EPAC – US CLASS 1 – SIZE K – S/N POLE BICYCLE.COM – POLE VOIMA 2022 – MAX TOTAL WEIGHT 150 KG – 250 W – 25 KMH (US/CAN 20 MPH) – CATEGORY 5 – EN 15194 / EN 17404 EPAC – US CLASS 1 – SIZE K – S/N |
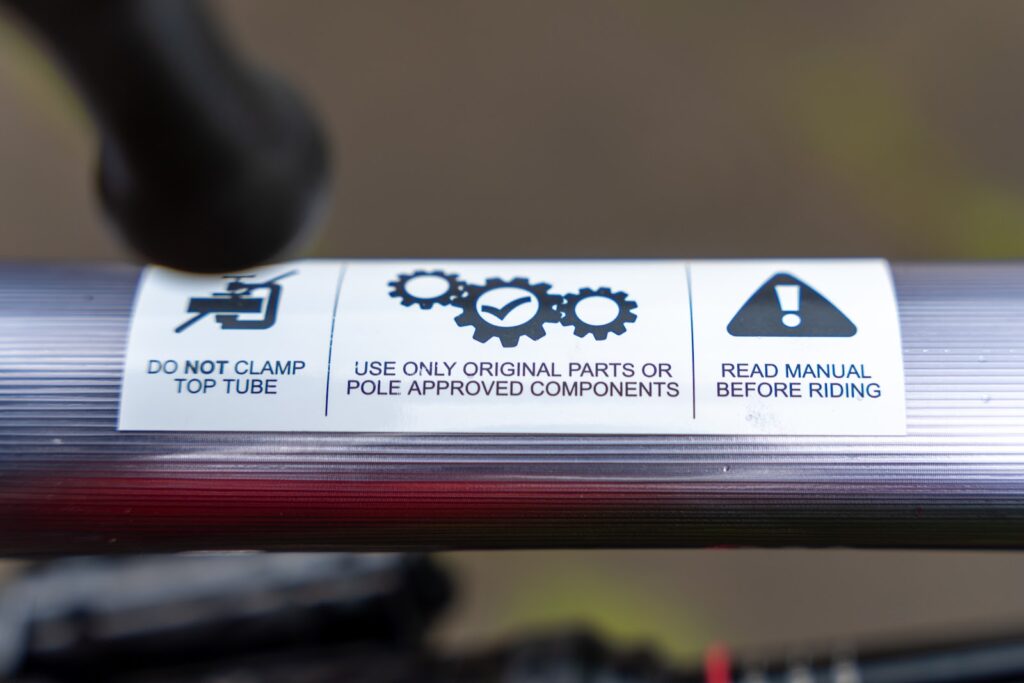
Important Information
 DO NOT CLAMP TOP TUBE DO NOT CLAMP TOP TUBE |
 USE ONLY ORIGINAL PARTS OR POLE APPROVED COMPONENTS USE ONLY ORIGINAL PARTS OR POLE APPROVED COMPONENTS |
 READ MANUAL BEFORE RIDING READ MANUAL BEFORE RIDING |
Intended Use
| Type and Model | Terrain | Max Weight Limit * |
| EnduroVoima E-Bike | Trails relative to Enduro World Series (EWS) racetracks, jumps with transition landings, moderatedrops with transition landings | 150 kg330 lbs |
* Maximum weight limits include the bike and the rider weight plus gear and luggage (helmet, clothing, backpack, luggage carrier, etc.). Make sure to adhere to your suspension and parts manufacturer’s recommended weight limits, as they may have lower weight limits than what is shown in the table above.
| Pole Voima is not proposed for downhill tracks or high jumps and drops without proper transition landings. | |
| The A-weighted emission sound pressure level at the rider’s ears is less than 70 dB(A) |
Specs
| SEAT TUBE STANDARD | 34.9 MM |
| SEAT TUBE CLAMP | 38.5 MM |
| AXLE TO CROWN | 606 MM |
| HEADSET STANDARD | ZS44 / ZS56 – NOT INCLUDED |
| BRAKE MOUNT | DIRECT MOUNT 200 MM |
| TRAVEL FRONT | 190-200 (DUAL CROWN COMPATIBLE) |
| TRAVEL REAR | 190 |
| SHOCK SIZE | 250 X 75 MM |
| SHOCK HARDWARE | 15 X M8 |
| BB | ISIS |
| CHAIN DEVICE | POLE DIRECT MOUNT WITH ABSOLUTE BLACK GUIDE S3 /E-TYPE |
| BOTTLE MOUNTS | THREE |
| DROPOUTS | 148MM (BOOST) SRAM UDH |
| AXLE | 180MM, THREAD LENGTH 20MM, THREAD PITCH M12X1.0 |
| WHEELS | 29″ 730-755 MM |
| RECOMMENDED MAX TIRE SIZE | 2.6″ (29″) |
| SHIFTING | ONE-BY ONLY, 38T MAX |
| CABLE ROUTING | INTERNAL |
| LINK PIVOT BEARINGS | 12 X 6805 LLU MAX (25X37X7 MM), 4 X 698 LLU MAX (8X19X6 MM) |
| RECOMMENDED SHOCK | ROCKSHOX SUPER DELUXE / CANE CREEK KITSUMA |
| MATERIAL | 7075 T6 ALUMINIUM |
| COLORS | RAW CLEAR AS STANDARD (FOC) – STORM GREY AND TRUE GOLD |
| FRAME TESTING STANDARD | CAT-5 CERTIFIED DH STRENGTH, EFBE TRI-TESTED |
| MAX SYSTEM WEIGHT | 150KG (COMBINED RIDER + BIKE WEIGHT) |
Geometry
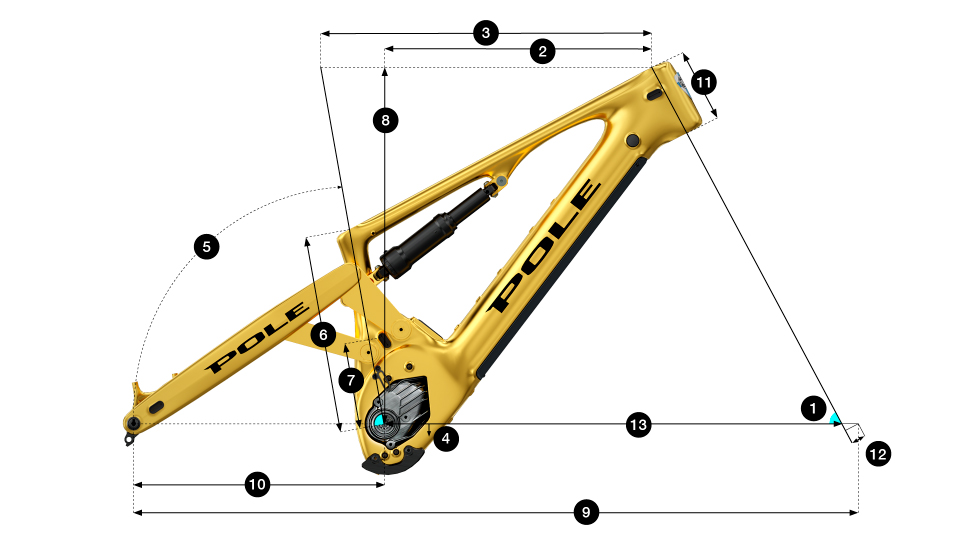
| FRAME SIZE * | K1 | K2 | K3 | K4 |
| 1. HEAD ANGLE | 63.5° | |||
| 2. REACH | 450 | 480 | 510 | 535 |
| 3. TOP TUBE | 561 | 591 | 621 | 646 |
| 4. BB “DROP” | 0 | |||
| 5. SEAT TUBE ANGLE | 80° | |||
| 6. SEAT TUBE ANGLE (EFFECTIVE) | 360 | 360 | 400 | 420 |
| 7. MAX INSERTION DEPTH | 153MM ABOVE THE BB | |||
| 8. STACK | 635 | 648 | 648 | 648 |
| 9. WHEELBASE | 1283 | 1313 | 1343 | 1368 |
| 10. CHAINSTAY LENGTH (EFFECTIVE) | 455 | |||
| 11. HEAD TUBE LENGTH | 125 | 140 | 140 | 140 |
| 12. FORK OFFSET | 44-51 | |||
| 13. FRONT CENTER | 857 | 887 | 917 | 942 |
* Dimensions in millimeters unless otherwise stated
Components
| MOTOR | BOSCH PERFORMANCE LINE CX GEN 4 DRIVE UNIT |
| BATTERY | BOSCH 750WH POWERTUBE 750 BATTERY |
| REAR AXLE | MAXLE STEALTH |
| REAR SHOCK | CANE CREEK KITSUMA / ROCKSHOX SUPER DELUXE ULTIMATE AIR, 250×75 |
| REMOTE | BOSCH HANDLEBAR-MOUNTED LED REMOTE |
| CHARGER | BOSCH 4A |
Recommended Components
| BATTERY | BOSCH 750WH POWERTUBE |
| BRAKES | SRAM CODE R 220/200MM |
| CASSETTE | SRAM GX – 1275 EAGLE LUNAR 10-52T |
| CHAIN | SRAM GX EAGLE CHAIN 12-SPD |
| CRANKSET | RACEFACE AEFFECT-R E-MTN |
| CHAINRING | RACEFACE DM 34T, STEEL, 52MM CHAIN LINE |
| DERAILLEUR REAR | SRAM GX EAGLE LUNAR 1×12-SPD |
| FORK | ROCK SHOX ZEB 190MM 29”, BOOST™ 15X110, 44MM OFFSET |
| HANDLEBAR | RACEFACE CHESTER 35MM, 780MM 20MM RISER |
| HEADSET | CANE CREEK ZS44/ZS56 |
| SEATPOST | SDG TELLIS (K1: 125MM / K2: 150MM / K3: 170MM / K4: 200MM) |
| SHIFTER | SRAM GX EAGLE LUNAR TRIGGER SHIFTER 12-SPD |
| SHOCK | ROCKSHOX SUPER DELUXE ULTIMATE AIR / CANE CREEK KITSUMA |
| STEAM | RACEFACE CHESTER |
| TIRES | MAXXIS ASSEGAI / DHR II DD 29” X 2.5” |
| WHEELSET | MAVIC E-DEEMAX 30 29” |
When assembling your bike, please check that the components you have chosen are suitable for mountain and E-bike use.
Torque Values and Chemicals
Frame Torque Values
| 1. YOKE BOLTS ON UPPER LINK AND FRAME | 5MM HEX KEY, M8 | 15 NM |
| 2. FRAME PIVOT BOLTS | 6MM HEX KEY, M18 | 20 NM |
| 3. SWINGARM PIVOT BOLTS | 6MM HEX KEY, M20 | 20 NM |
| 4. SHOCK EYELET BOLTS | 5MM HEX KEY, Ø8MM | 10 NM |
| 5. SEAT CLAMP BOLTS | 3MM HEX KEY | 6 NM |
| LINK PIVOT BEARINGS | 12 X 6805 LLU MAX (25X37X7 MM)4 X 698 LLU MAX (8X19X6 MM) |
| Frame bearings should be removed and installed by an experienced bike mechanic |
COMPONENT Torque Values
These specifications are guidelines. Check component manuals for more details.
| BRAKE CALIPER SCREW TO FRAME AND FORK | 5 MM HEX | 9 –10 NM |
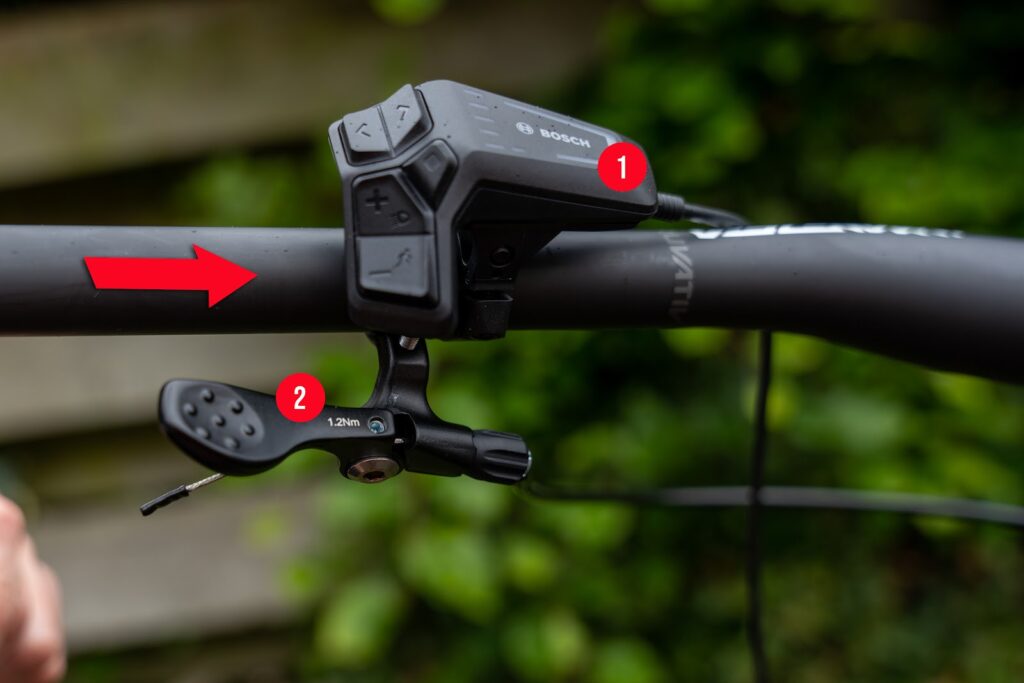
| TRIGGER CLAMP BOLT | T25 TORX | 2.5 – 4 NM |
| DISC BRAKE BOLTS TO HUB | T25 TORX | 6.2 NM |
| REAR DERAILLEUR (FIXING BOLT) | 5 MM HEX | 10 – 12 NM |
| REAR DERAILLEUR (CABLE CLAMP BOLT) | T25 TORX | 4 – 5 NM |
| BRAKE LEVER CLAMP | T25 TORX OR 3 MM HEX | 5 – 6 NM |
| CASSETTE RETAINER RING | CASETTE TOOL | 25-30 NM |
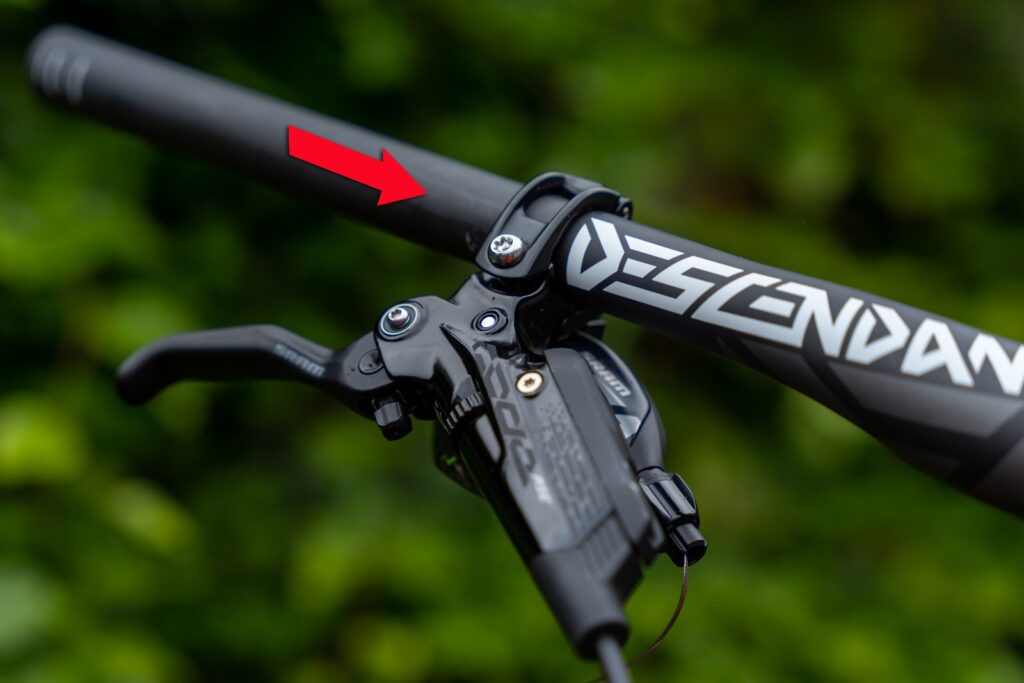
| HANDLEBAR CLAMP (CARBON / ALUMINUM) | 4 MM HEX | 6 NM |
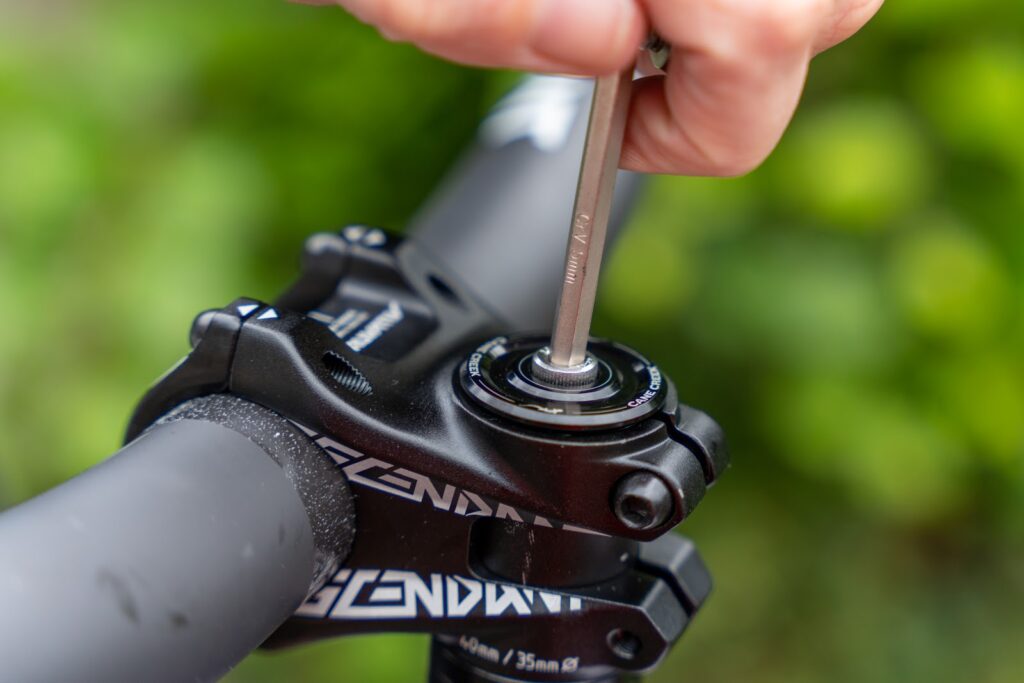
| HEADSET TOP CAP | 5 MM HEX | 1.1 – 1.7 NM |
| STEM (STEERER TUBE CLAMPING) | 4 OR 5 MM HEX | 5-9 NM |
| CRANK BOLTS | 8 MM HEX | 30 NM |
| PEDALS | N/A | 38 NM |
| LOCK-ON GRIP BOLTS | 2.5 MM HEX | 3 NM |
| REAR AXLE | 5 MM HEX | 12 NM |
| BATTERY COVER | 2 MM HEX | 0.5NM |
Recommended Chemicals
| We recommend the following chemicals: | |
| Headset bearing installation | Park Tool HPG-1 |
| Axle and linkage installation | Park Tool HPG-1 |
| Frame cleaning (grease, fingerprints, dirt) | Muc-OFF biodegradable Nano Tech Bike Cleaner |
| Linkage bearings (for bearing outer race) | Loctite 641 |
| Do not use copper paste or any other product not mentioned in the instructions during the assembly. | |
| Avoid excessive use of brake cleaners and solvents. | |
| Do NOT grease seatpost |
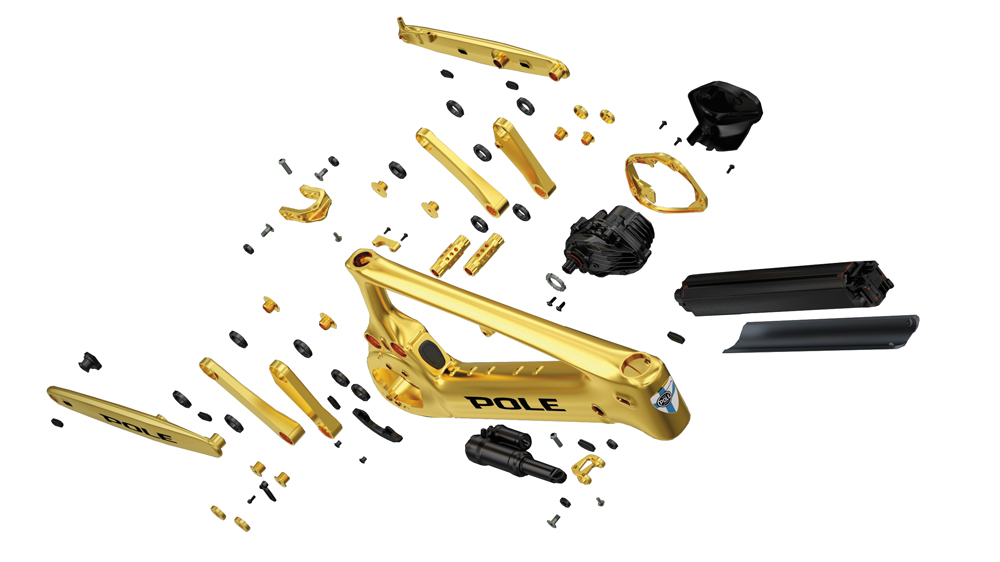
Assembly
| Check Pole Bicycle Company on YouTube for more tips and instructions! |
Check recommended chemicals and torque values from the previous chapter. The bike should be assembled by an experienced bike mechanic.
Preparations and Frame
First, remove the frame and all components from the shipping box and/or parts boxes.
Attach the frame to a bike stand via the seatpost.
NEVER clamp the frame by the top tube.
Battery
Never ride or transport your Voima without the battery compartment being covered.
Take out the protector carefully.
Necessary fasteners are taped to the cover into the corresponding holes.
Screw the battery cover to the battery using the screws taped to the cover. Be cautious to not mix up the screws.
2 x Longest screw: At the top edge two holes
1 x Middle length screw: At the lower edge
1 x Shortest screw: At the bottom
Seatpost and Saddle

Install the saddle on the seatpost and snug up the rails.
Place the dropper post cable end in the slot in the bottom of the post and pull the cable housing in place.
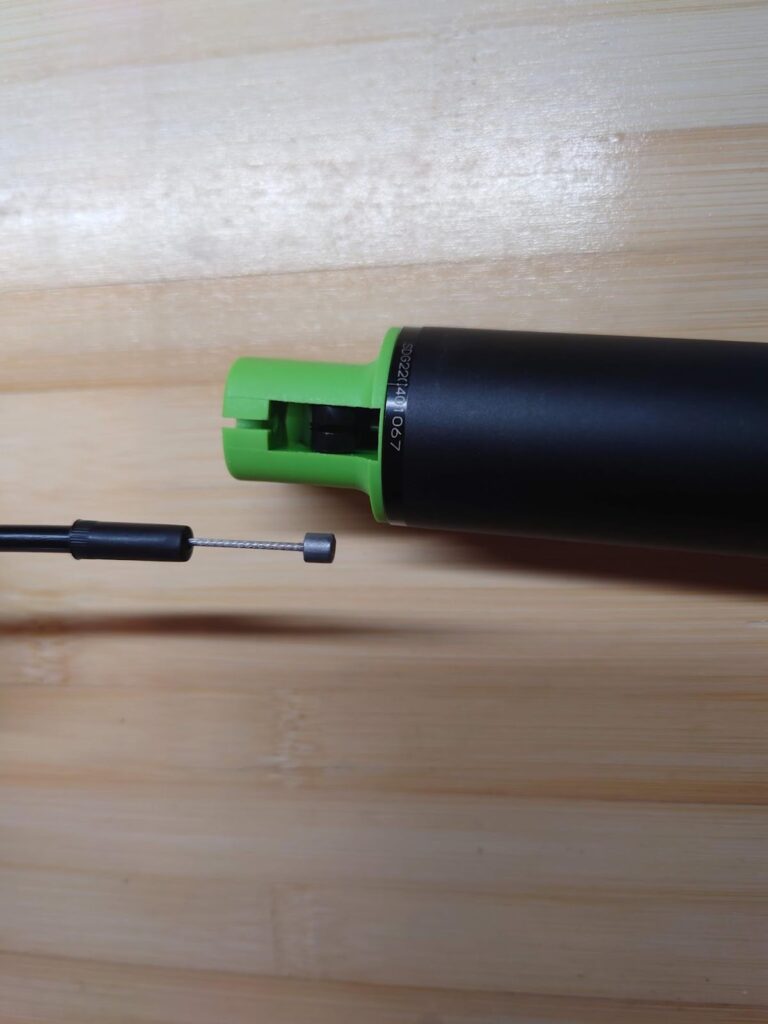
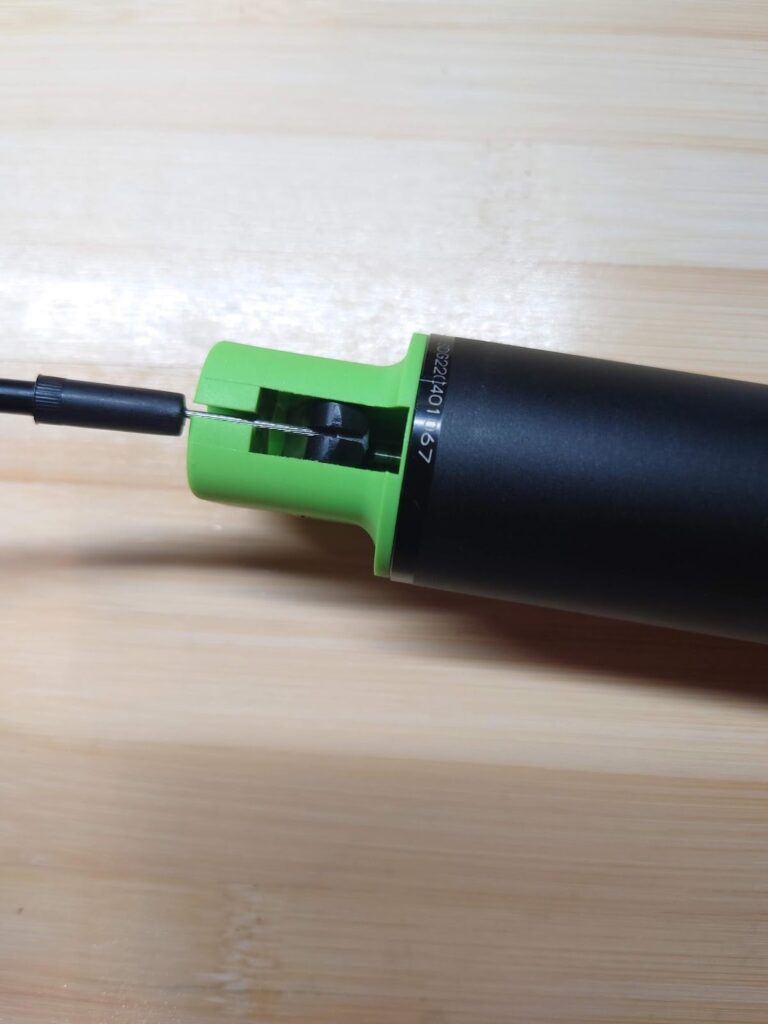
Insert the seatpost in the seat tube. Help the cable, by pulling slightly from the lever end.
Adjust the height of the seat and tighten the seat post clamp. Tighten the rearward bolt first, then tighten the forward one.
| Note the indicated minimum insertion depth on your seatpost. If you are using fixed seat post, insert it minimum of 100 mm deep |
Rear Derailleur
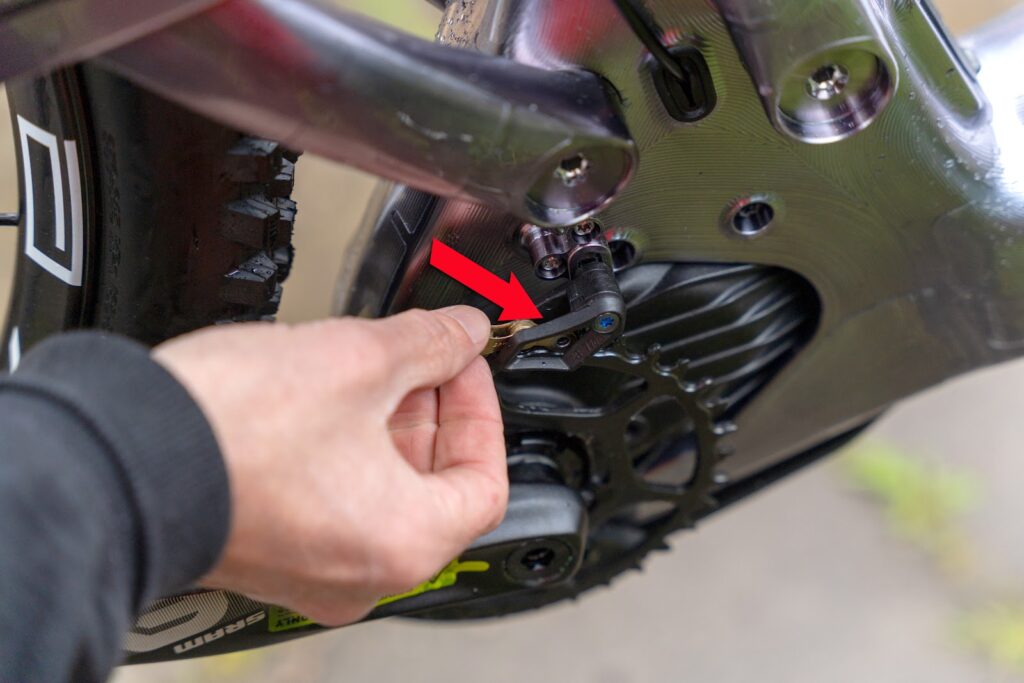
Attach the included rear derailleur to the derailleur hanger. Make sure the b-tension adjuster is seated properly on the hanger tab and torque the derailleur fixing bolt to spec.
Fork
| Check cable and hose routing so that they don’t circulate the steerer tube and don’t wear |
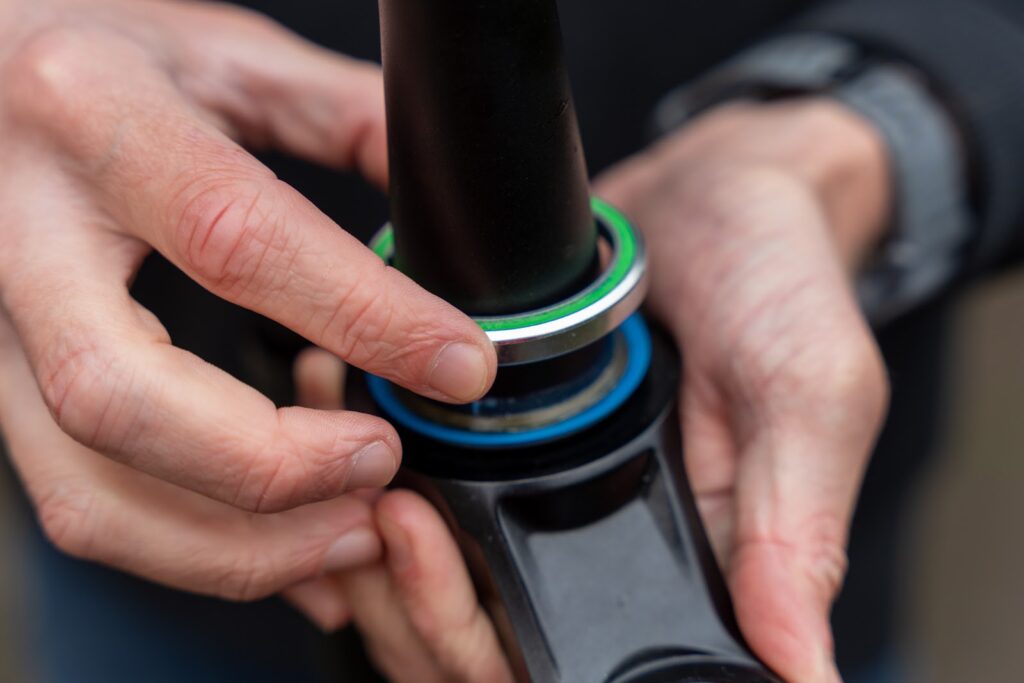
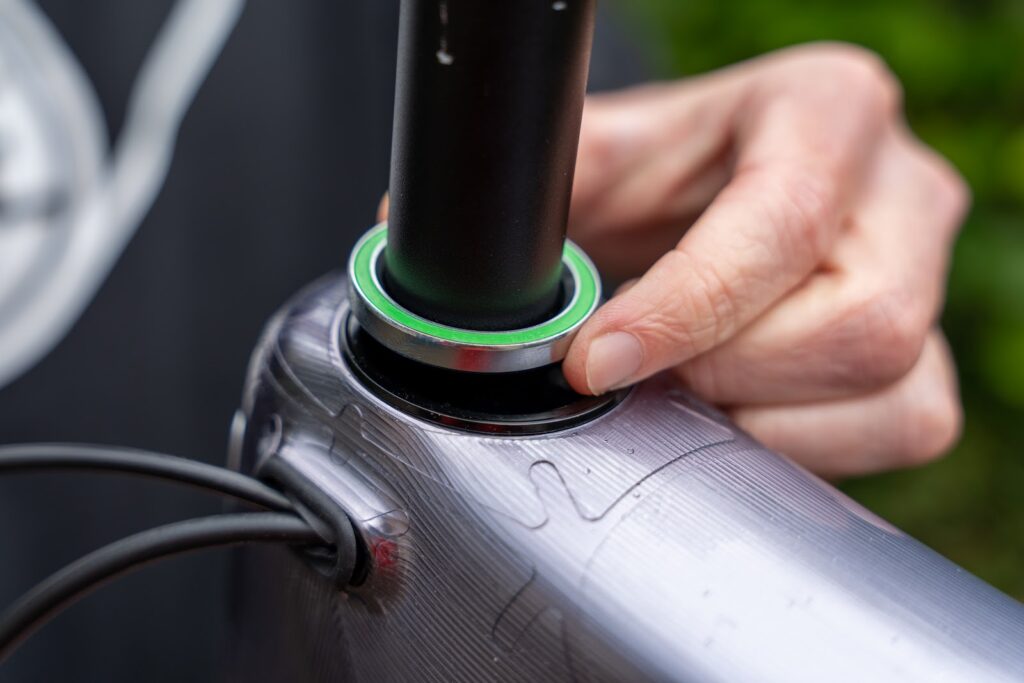
Insert lower headset bearing on the steerer tube.
Apply a small amount of grease into both headset cups.
Slide the fork through the headtube.
Place over the steerer tube and into the upper bearing into its cup.
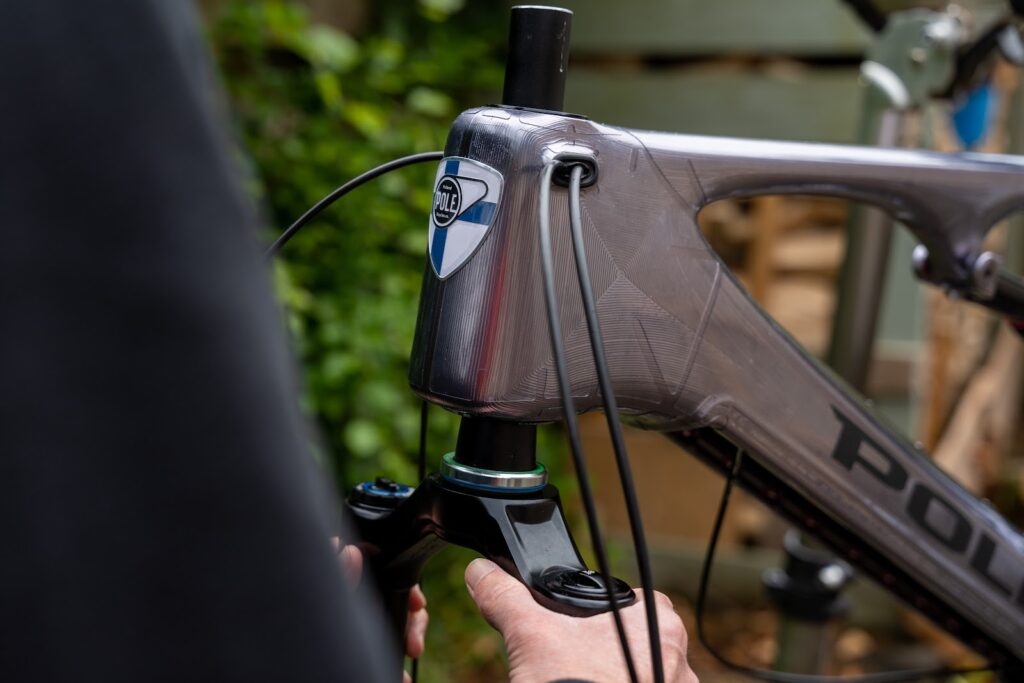
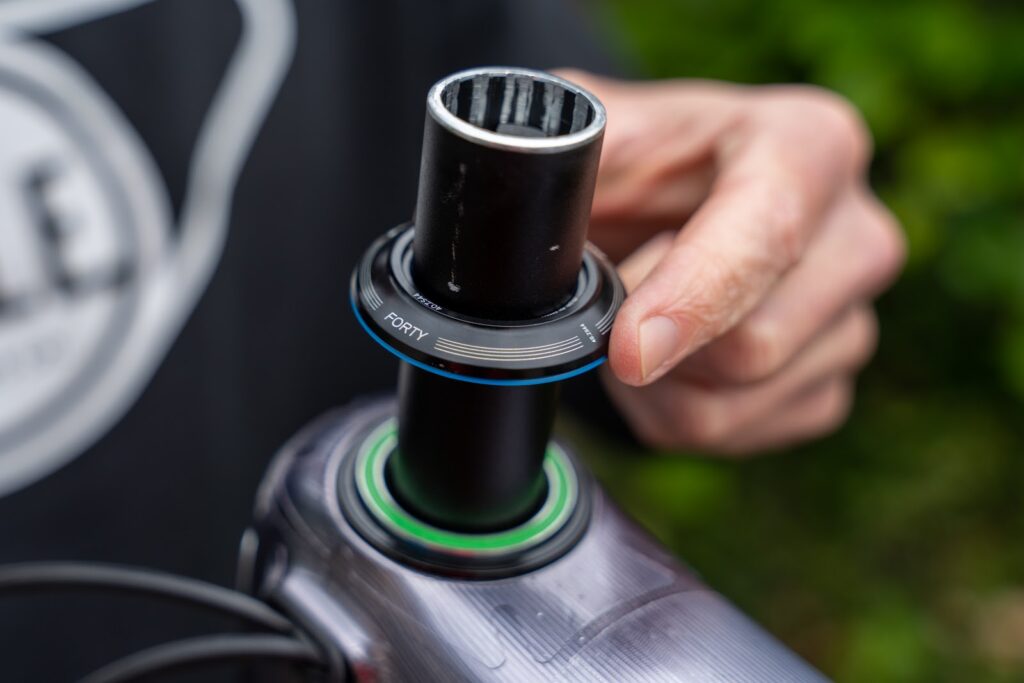
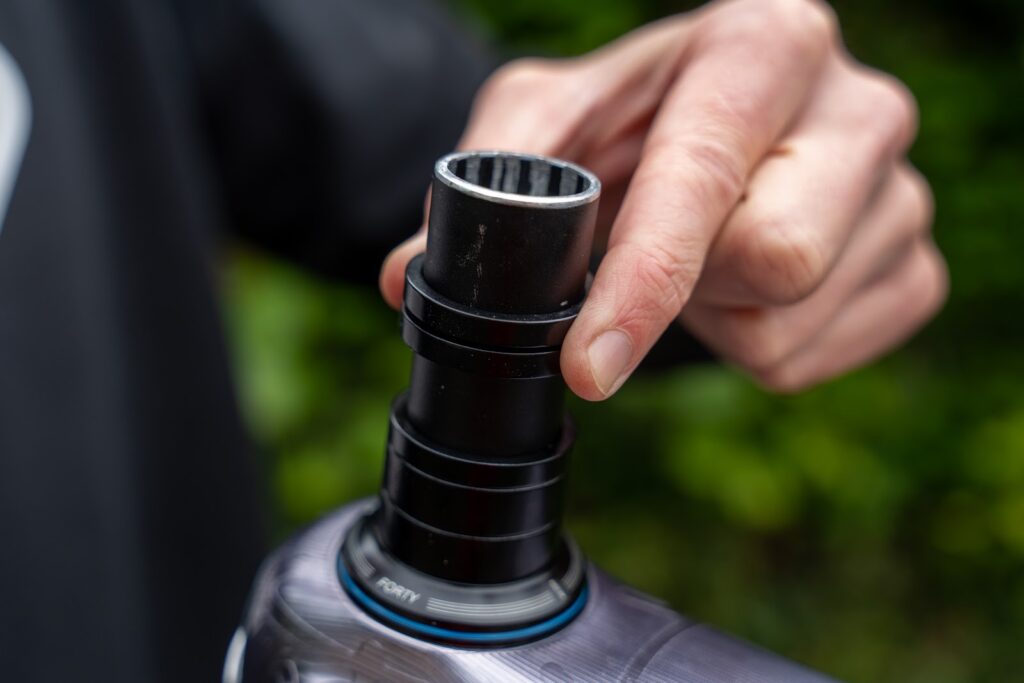
Assemble headset compression ring / dust cap and some of the included stem spacers on the headset.
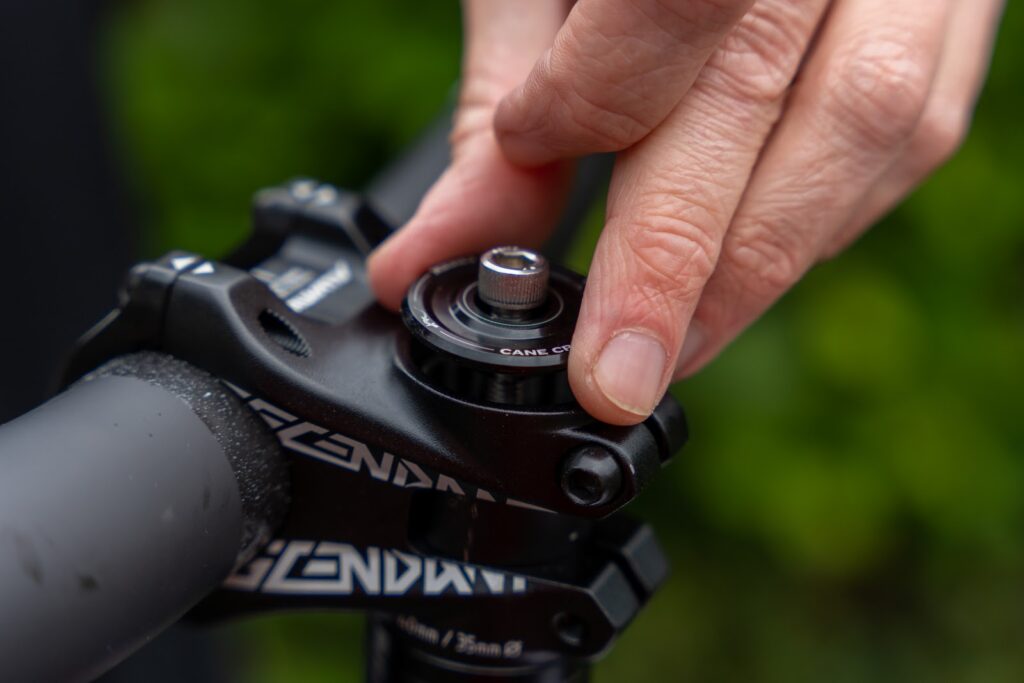
Place the stem on the steerer tube and place the rest of the spacers on the steerer tube.
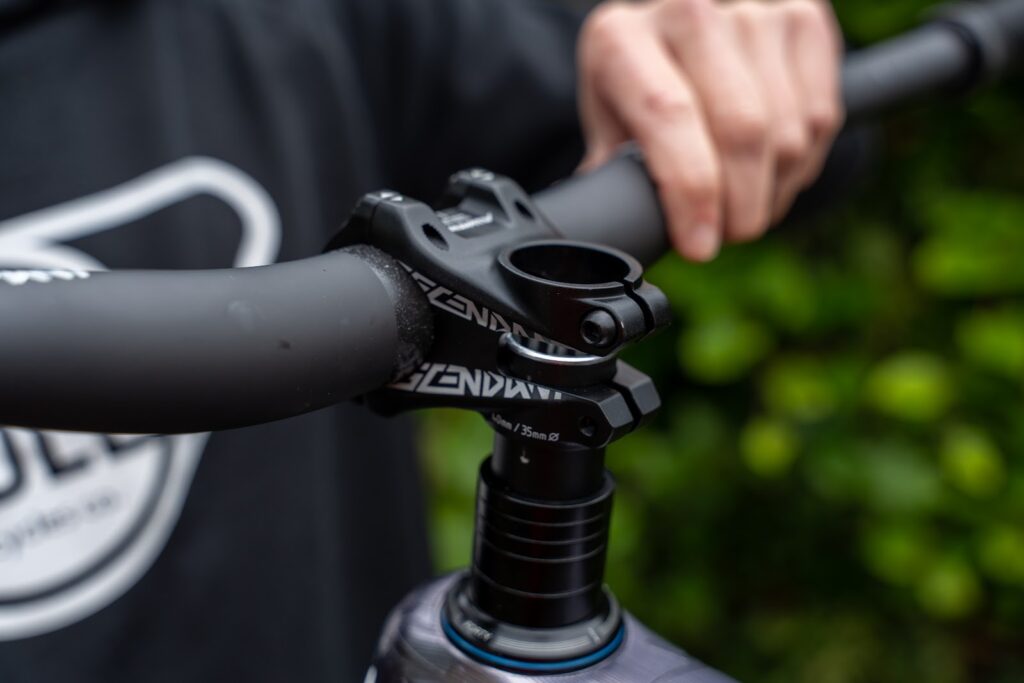
Torque the top cap to spec.
Line up your handlebars with the fork and torque up the stem pinch bolts to spec. Make sure to tighten the bolts gradually and evenly. Finally tighten the top cap a little to keep it getting loose.
| Double check stem tightness to avoid risk of injury! |
Handlebar
Attach your rear brake lever loosely on the right side of the handlebar.
Place your shifter on the handlebar, right of the right brake lever. Or with a matchmaker clamp together with brake lever.
Attach your front brake lever loosely on the left side of the handlebar.
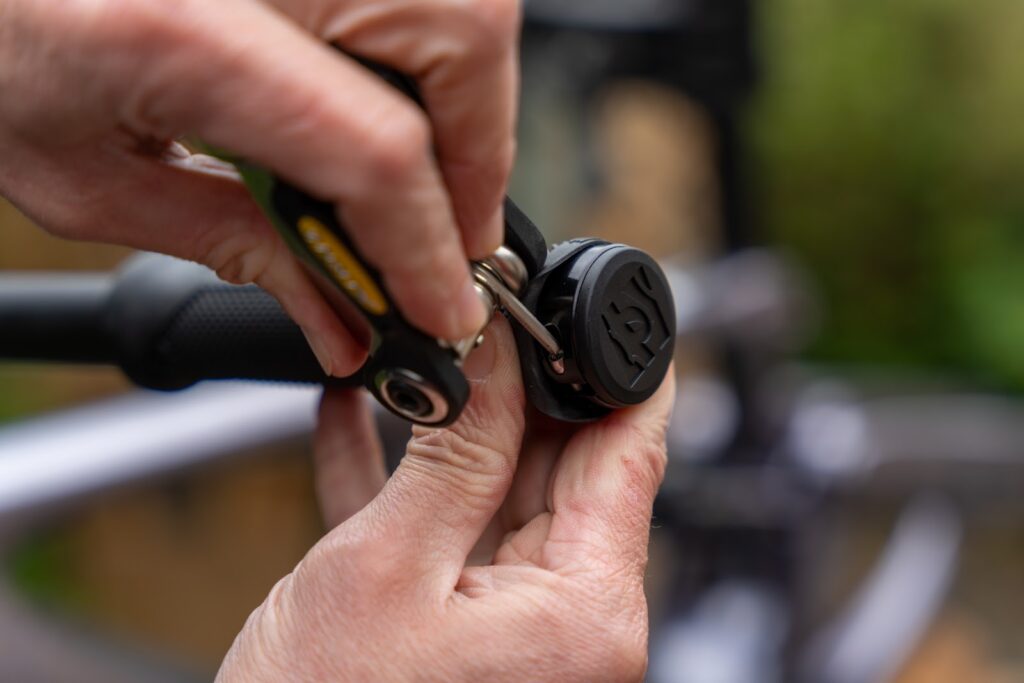
Attach Bosch LED display on the left side of the brake lever.
Place your dropper lever on the left side of the Bosch LED display
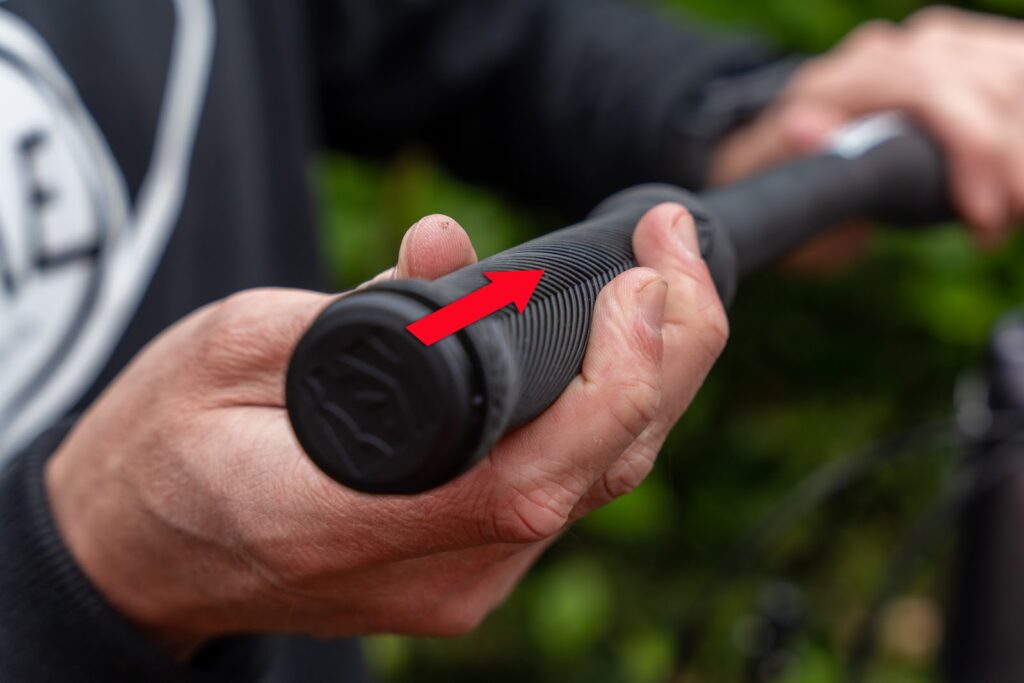
Slide on the gribs and tighten to spec.
Adjust everything to your preferred setting and tighten to spec.
Brakes
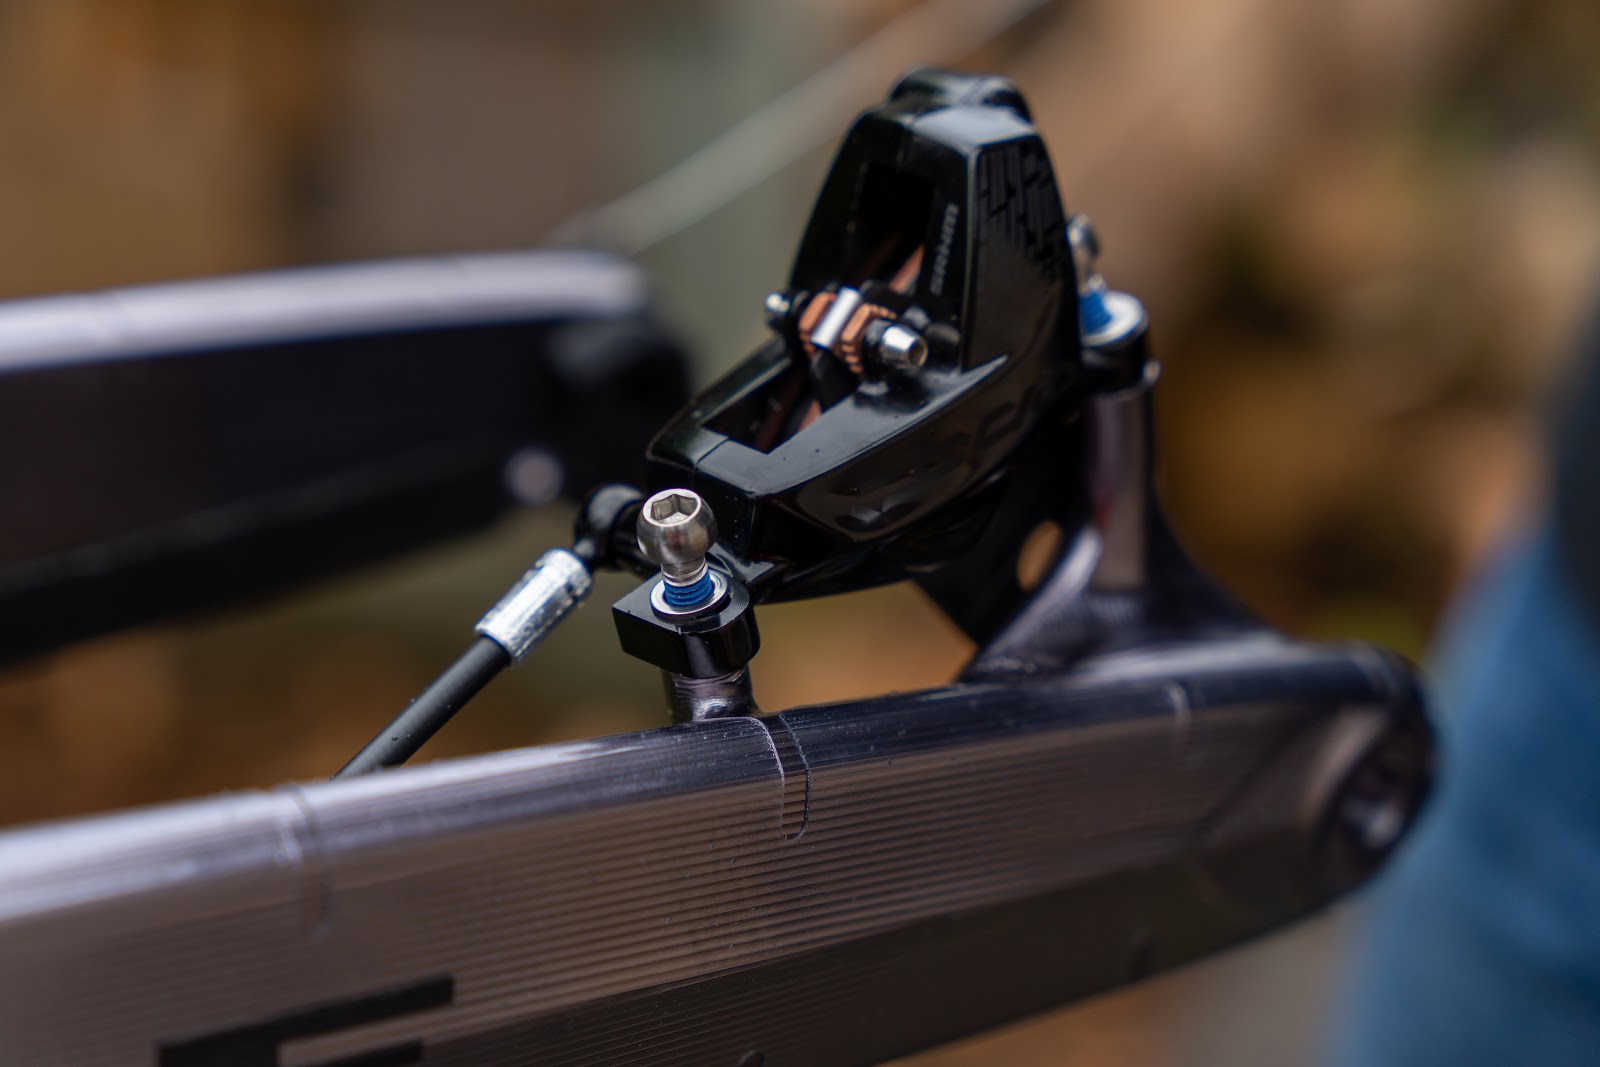

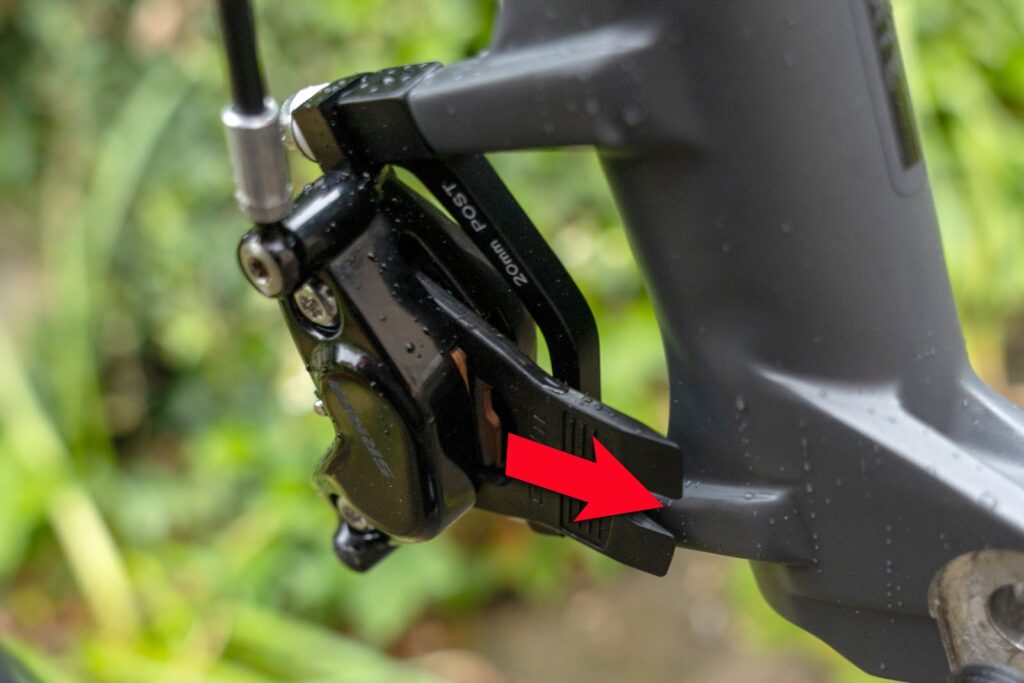
Assemble the rear brake calliper on its mount and screw the bolts in so that the calliper moves left and right freely.
After assembling the rear wheel, press the rear brake and tighten two bolts to spec while holding the brake.
Repeat the procedure on your front brake.
Place your front brake hose on the hose clamp located on the left fork leg. Tighten the crew to spec.
In case your brakes rub excessively you may centre it manually by loosening one bolt at the time and tweaking the calliper by hand.
Front Wheel
Take out the brake pad spacer from the front brake caliper.
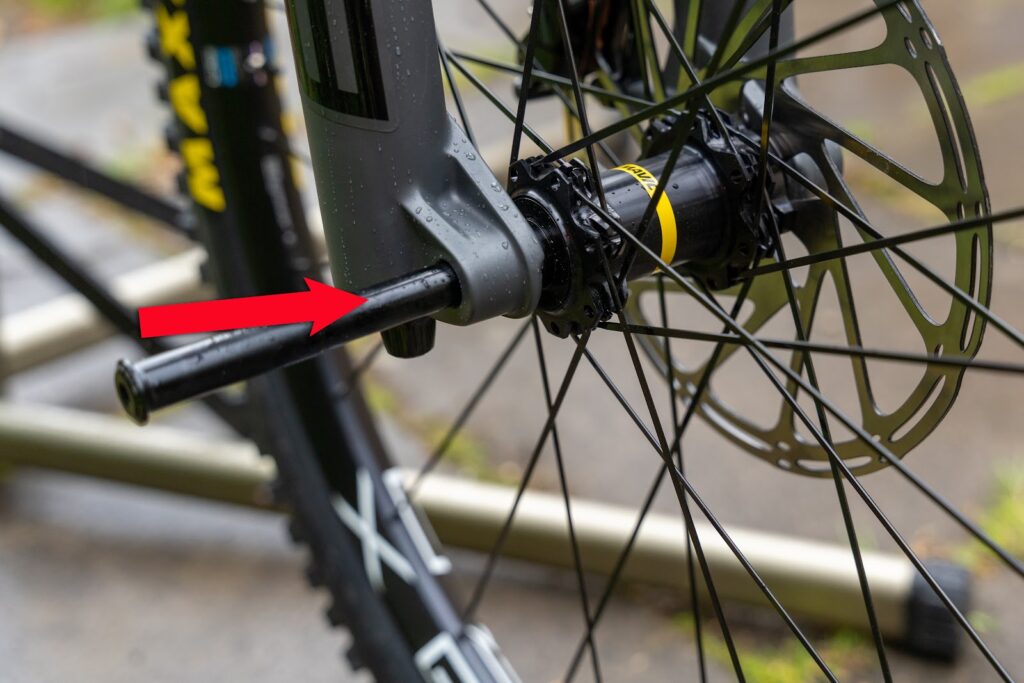
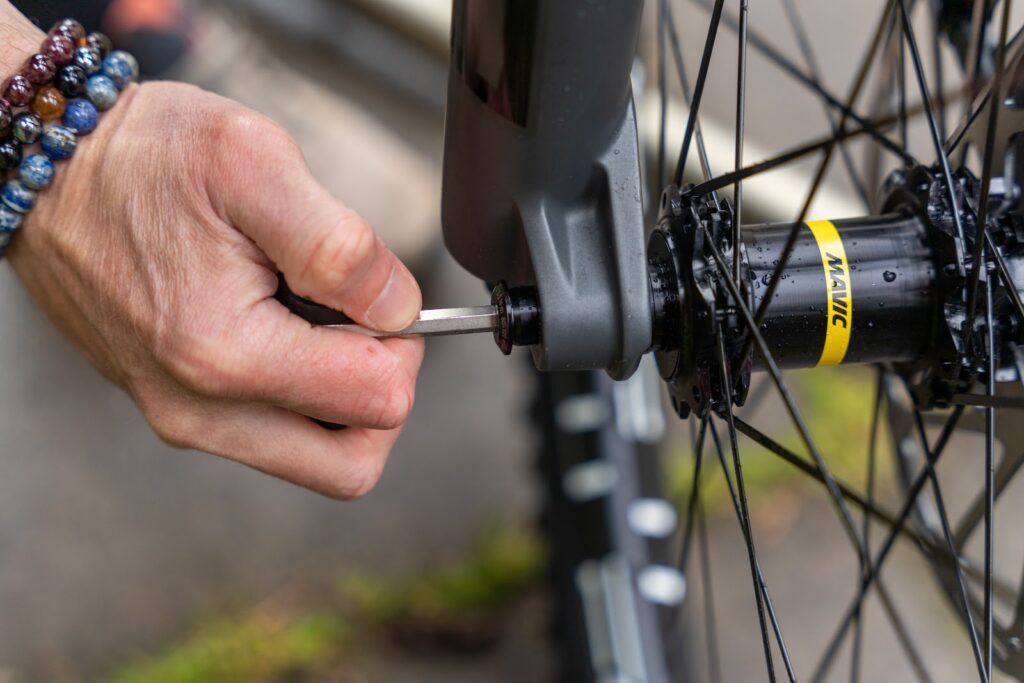
Apply a thin layer of grease on the maxle front axle.
Insert the front wheel in the fork paying attention to placing the brake rotor carefully between the brake pads.
Push the front axle to its place and tighten to spec. In case your fork has a quick release axle, adjust the lever following manufacturer instructions, so it’s parallel with the fork leg when properly fastened.
Rear Wheel
Take out the brake pad spacer from the rear brake calliper.
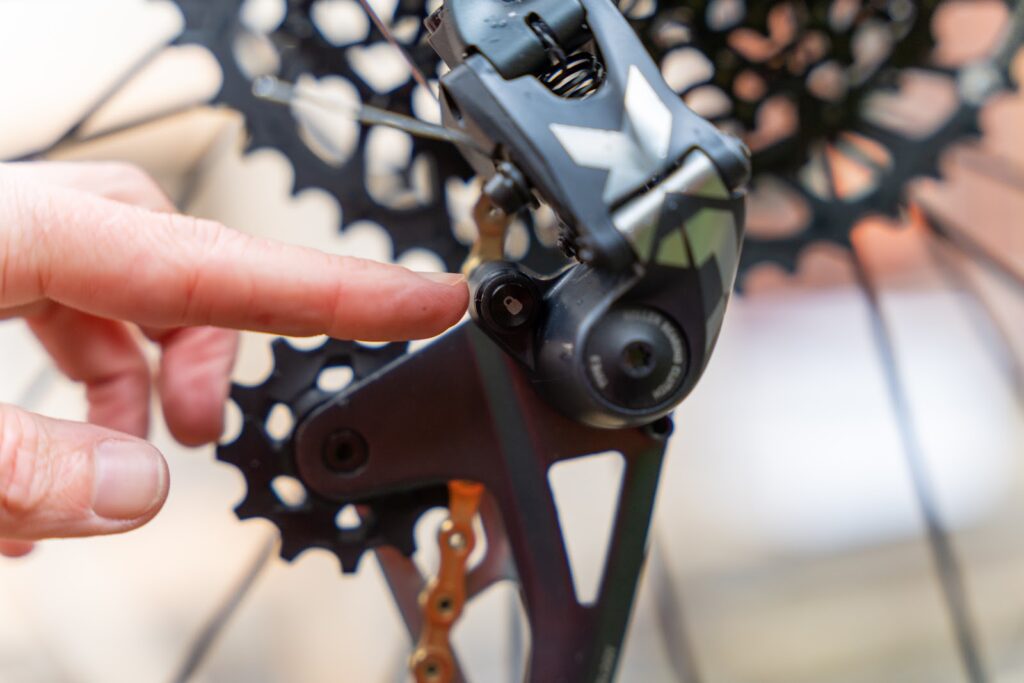
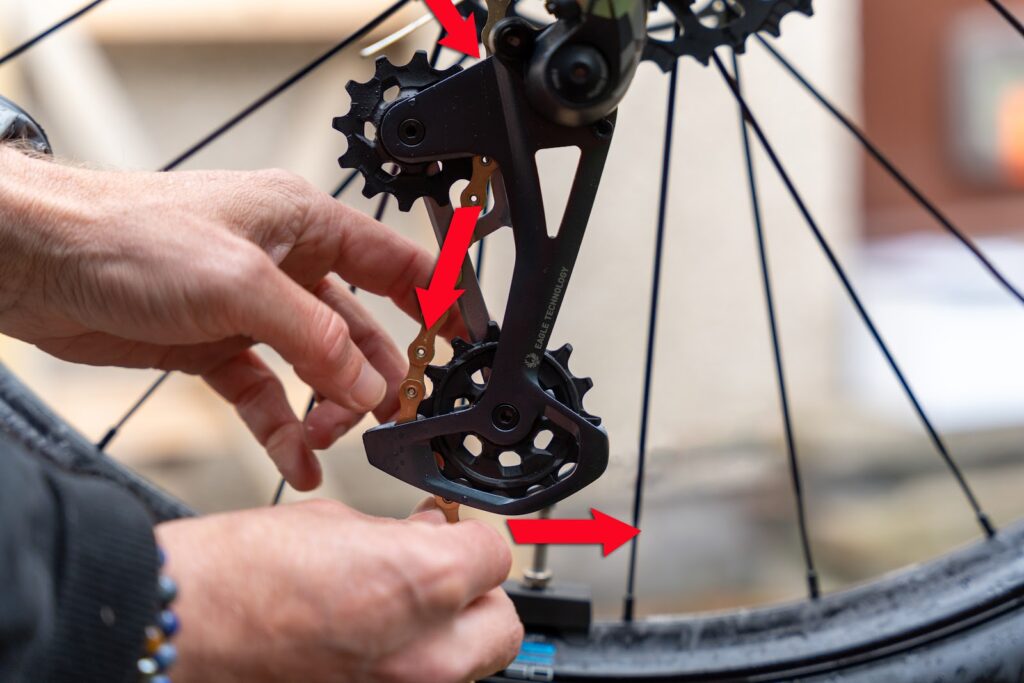
Put the rear derailleur to its service position by pushing the cage forward and locking it in place with the lock button.
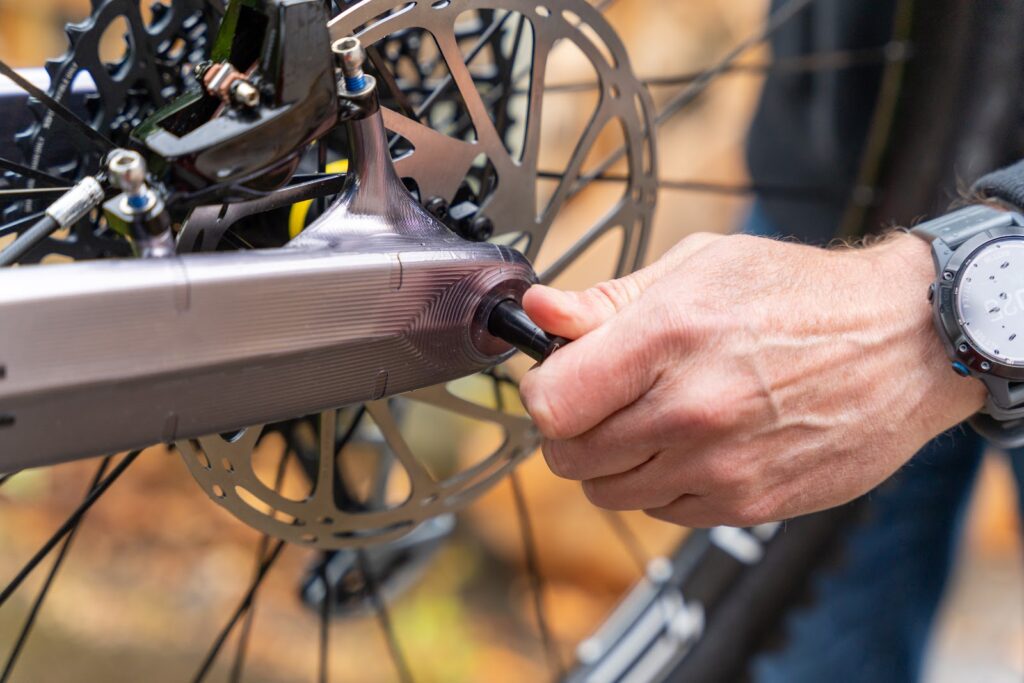
Apply a thin layer of grease on the rear axle.
Insert the rear wheel in place paying attention to placing the brake rotor carefully between the brake pads.
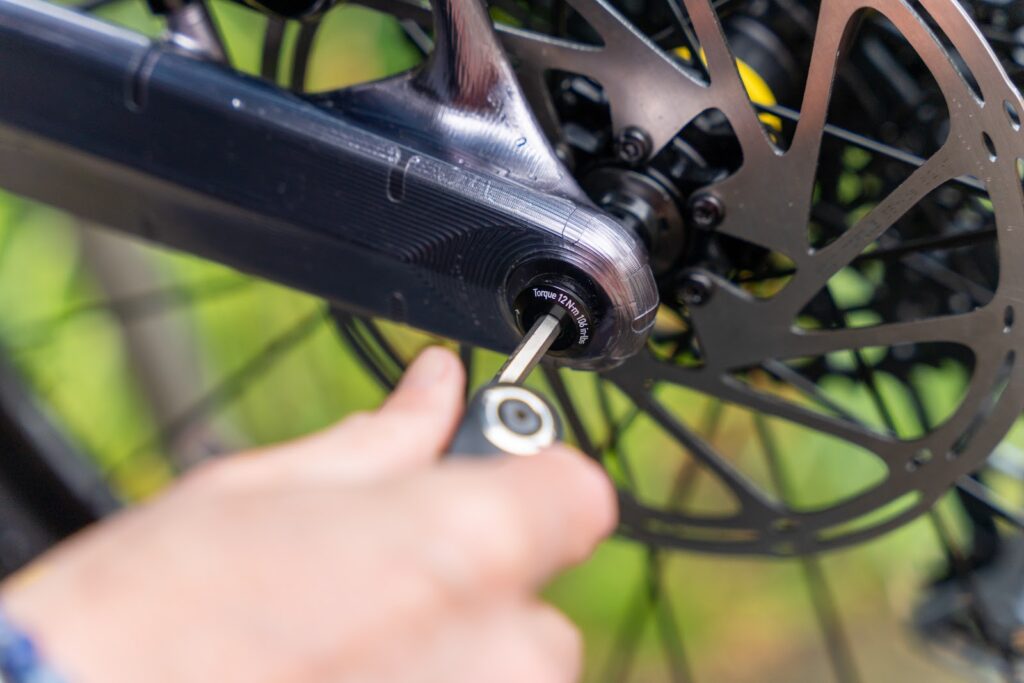
Push the rear axle to its place and tighten to spec.
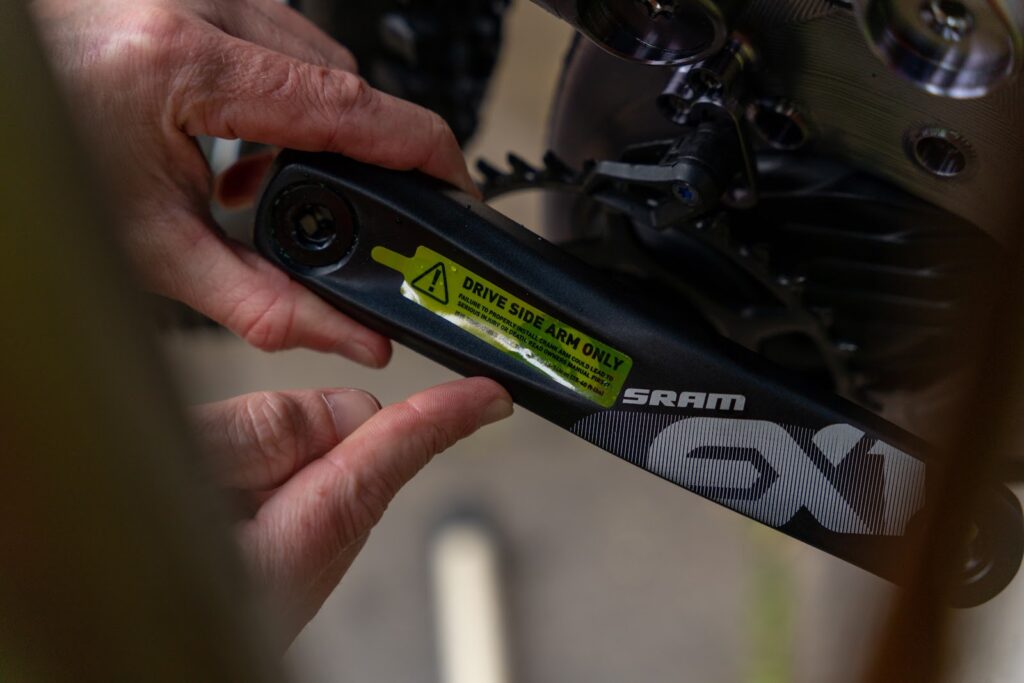
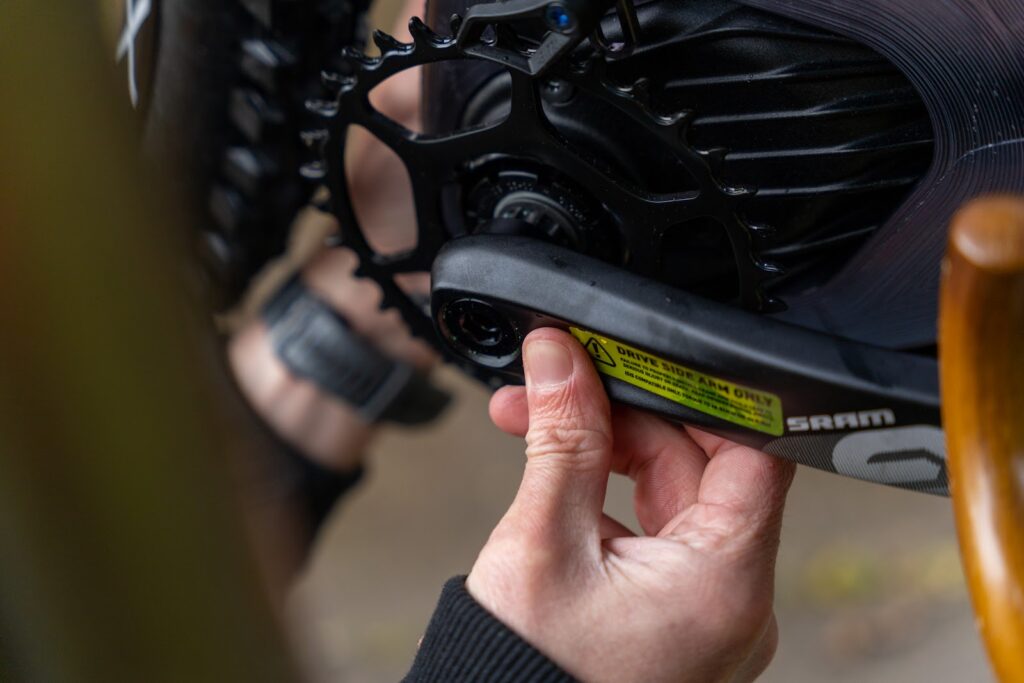
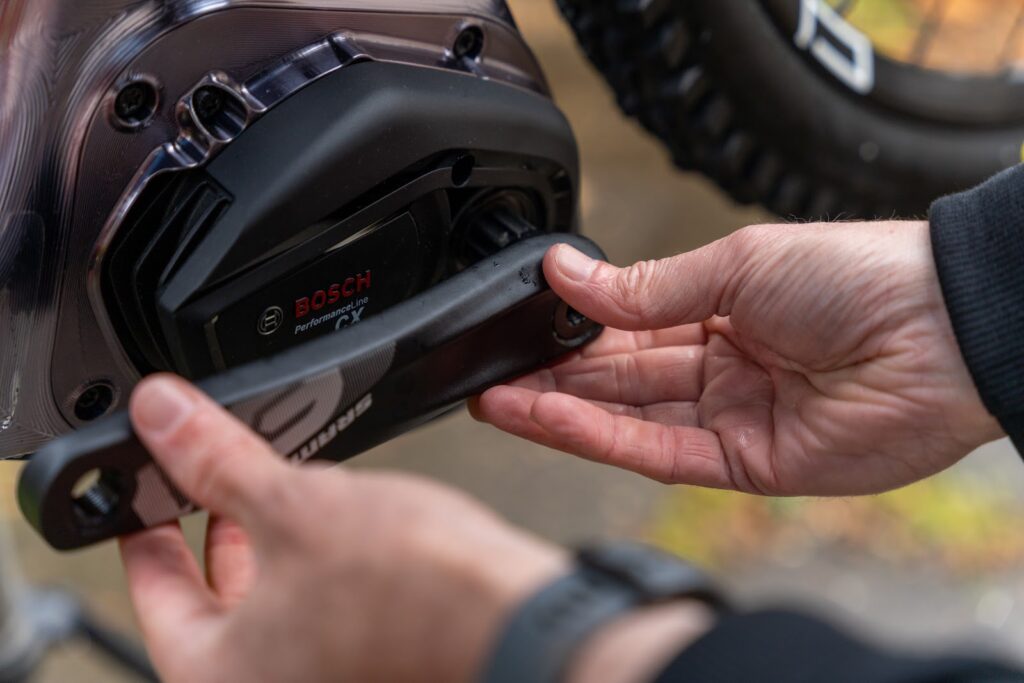
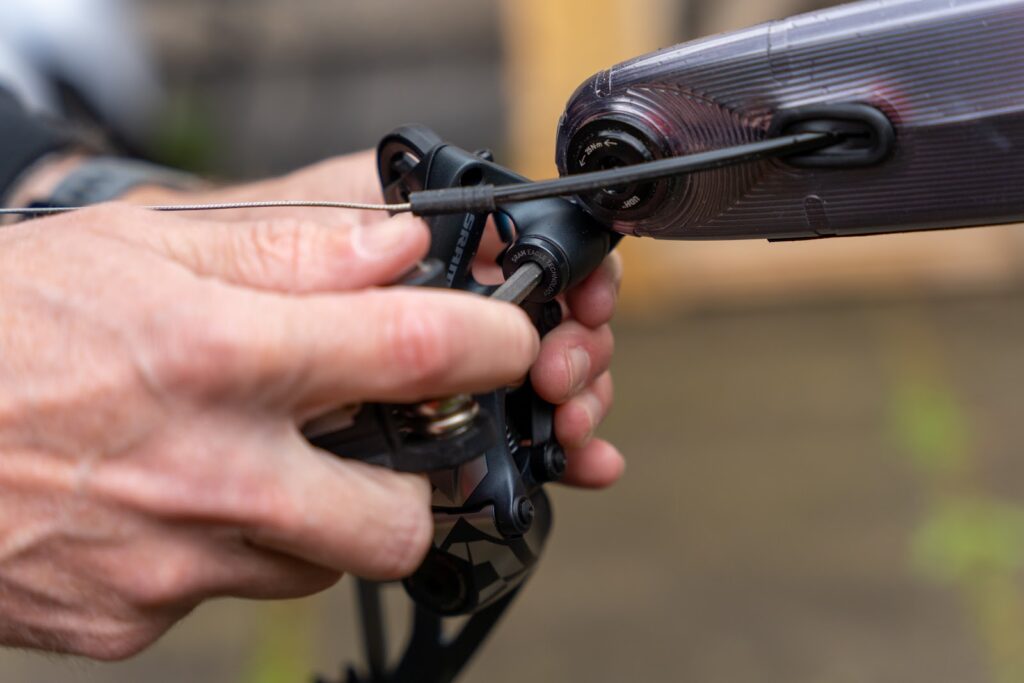
Apply a small amount of grease to motor axle splines and crank bolt threads.
Assemble drive side crank arm and snug up the bolt. Orient the non drive side crank 180 degrees away from the drive side crank and torque both crank arms to spec. Tighten on the ground/floor as stands & clamps might not provide sufficient support.
Chain

Make sure the shifter is in its highest gear.
Put the rear derailleur to its service position by pushing the cage forward and locking it in place with the lock button.
Route the chain around the smallest cog on the rear cassette into the rear derailleur paying attention to the guide tab and narrow wide tooth profile on the lower jockey.
Place the chain over the front sprocket through the chain guide minding the narrow wide tooth profile.
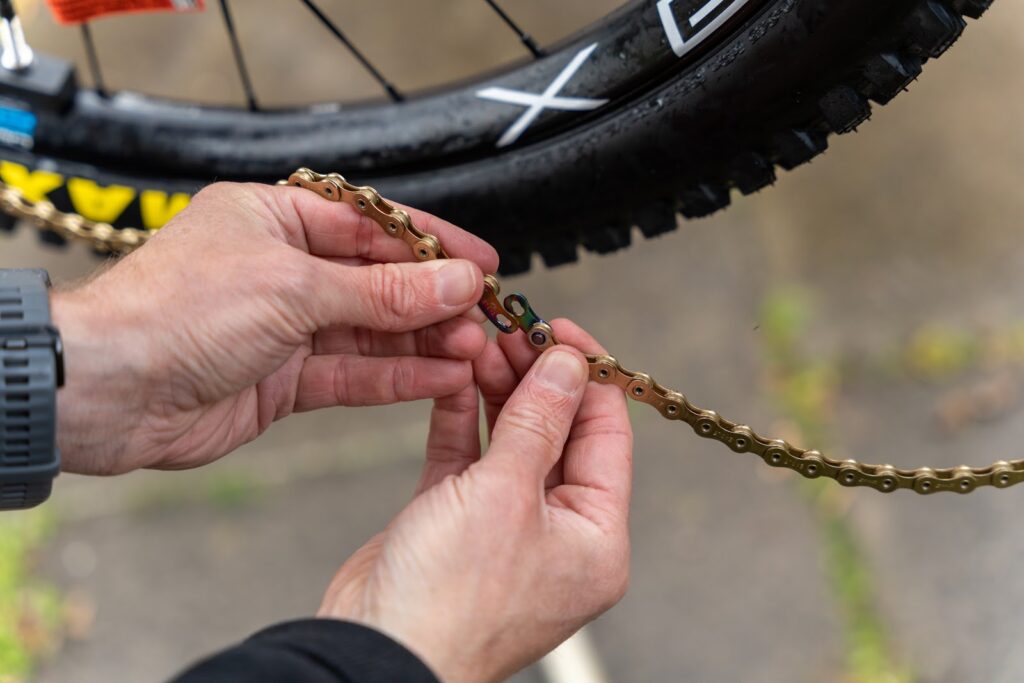
Connect the two ends of the chain with the masterlink paying attention to its orientation and pull on the chain until the master link clicks to place.
Release the derailleur from its service lock by pushing the cage forwards and releasing it.
Pedals
The Pole Voima does not come with pedals. We recommend Crankbrothers or Shimano pedals. Use a torque wrench when installing the pedals.
| Check toe clearance between your shoes and front tire. There should be at least 100 mm clearance between shoes and the front tire. |
Lights and Reflectors
We don’t supply the Pole Voima with lights or reflectors due to the nature of its intended use. If you are using your Voima on public roads, please comply with local and regional requirements for lighting and reflectors; we recommend using lights matching ISO 5742-1 and reflectors following E IV A specifications.
It is the sole responsibility of the rider to take adequate measures to comply with local and regional requirements regarding lights and reflectors. Pole Bicycles are not responsible for the rider/ owner’s choice and use of lights and reflector equipment.
| Check your local requirements for lighting and reflectors. |
Setup
| To get the most out of your Pole Voima, follow these instructions carefully! |
Tire Pressure
Check that your tire pressures are suitable for the terrain. Tire sidewalls are marked with the minimum and maximum tire pressures. For example, 1.6 bar (23 psi) is a good starting pressure for tires. Next, adjust your tire pressure to your weight. Tire pressure plays a critical role in how your bike handles. Overinflated tires can cause a harsh ride, and you may also lose traction. Your tire pressure should be set as low as possible without puncturing, damaging rims, burping tubeless, or tires rolling sideways. Huck Norris is a great product that can help you lower tire pressure without damaging tires or rims.
*do not exceed the maximum inflation pressure stated or your tire or rim*
Suspension Air Pressures
| Rider weight | Rear Shock Pressure Guideline Rockshox Super Deluxe Ultimate Air | Rear Shock Pressure Guideline Cane Creek DB Kitsuma Air |
| 70 kg / 154 lbs | 150 psi | 140-145 psi |
| 80 kg / 176 lbs | 160 psi | 165-170 psi |
| 90 kg / 189 lbs | 170 psi | 175-185 psi |
| 100 kg / 220 lbs | 180 psi | 200-210 psi |
| Before riding, check and adjust your shock seated SAG to 30%. |
Suspension
Your bike should be responsive. If your suspension is set too soft, you will have performance issues like using too much travel, losing speed, or in the worst-case scenario, excess nose-diving during braking or jumping. When increasing the spring rate, you must remember to add more rebound damping (Turn rebound knob clockwise). If there is not enough rebound damping, the bike will feel like a pogo stick. Too much rebound damping and the suspension will feel dead and lifeless on the trail. In between these two scenarios is a responsive, stable, and playful setup.
If you follow all of the above and encounter loss of traction at the front wheel, try to add one or two clicks of low-speed compression. The reason behind this might be that your fork is compressing too early in the corner. On a long bike, it’s not as easy to load the front end as much, so it’s easier to add more compression damping.
Fork
Many suspension forks have a table printed on the lower legs that have recommended settings on setting up the air pressure using psi/kg(lbs) and the rider’s weight. The markings will help set up the forks at a basic level, but even if you aren’t an enthusiast tuner, you should pay attention to your bike and how it rides and adjust as required.
You can get so much more from your bike after understanding why it has a 1000$ fork and not a 400$ fork. Fine-tuning is key to getting the best performance from your equipment.
Sag
The first step for a good setup with bicycle suspension is the sag. Rock Shox explains sag as; the amount of travel, measured as a percentage of total travel, that the suspension compresses when the rider, including gear, is on the bicycle in the normal riding position. Setting the correct sag allows the suspension to actuate effectively and efficiently. So in practice; Gear up, put your bike near something you can lean against, push the rubber band/o-ring on your fork’s stanchion down to the bottom, and gently climb on your bike. With fork sag, you should stand on your pedals to put a little bit more weight on the front wheel so that you are in a fast riding/attack position, ready to take on some hits. Carefully climb off the bike and check where the rubber band/o-ring has moved to. If the rubber band shows that the sag is between 10% to 20%, the bike will feel fast and grip nicely. However, on the other hand, the ride might feel too harsh for longer rides, and if the sag is too low, you might start to lose trail grip. If your sag is between 20% to 30%, you might lose a bit of the high-speed grip, but the ride will be much smoother. On the other hand, too much sag will cause the fork to bottom out on harder hits. Unfortunately, there is always a compromise, and there is no exception in the case of a full-suspension bike. Your fork setup is linked to your rear suspension if you have a full-suspension bike. The basic rule here is to adjust the suspension so that when you are bouncing on your bike, both the shock and fork should feel like they are traveling as much as possible. If it feels like your fork dives, you should add more air and vice versa.
Ok, that is the first step toward your fork tuning. However, there are a few more steps to take. For example, Rock Shox has several tuning options in their forks: rebound, low-speed compression, high-speed compression, threshold, and lockout. And if you have some other manufacturers fork, they may have some other names to add to the list.
Rebound
All good forks should have rebound adjustment. Rebound adjustment affects the speed of the fork extending after it compresses during a hit (e.g. how fast the fork bounces back from an impact). If you have adjusted the rebound so that the fork bounces back too rapidly, the bike might be hard to handle on rough trail sections, and you might lose control. On the other hand, if the rebound is adjusted too slow, the fork might not extend fast enough for the next hit or compression. There is no right or wrong setup here. Generally, a completely open or closed rebound is not a good setup. Otherwise, it mainly depends on how you ride and what makes you feel comfortable. The markings are slightly different for rebound adjustment, depending on the fork manufacturer. RockShox has a turtle and a rabbit, and it is straightforward to understand. The rabbit makes the fork bounce back faster and the turtle slower. However, Fox suspension uses + and – markings which are a little more confusing. The + symbol here doesn’t make the fork faster. Instead, it adds more resistance, so your fork has a slower rebound.
Low-Speed Compression (LSC)
The next step towards a better performing fork is low-speed compression (LSC) adjustment. LSC works, as the name suggests, at low speed when the shock is compressing slowly (you can still ride fast though!). First impressions of LSC adjustment you can feel when pedaling the bike. If it feels like your fork doesn’t carry the weight of the movement when you pedal, your LSC is adjusted too soft.
High-Speed Compression (HSC)
Most advanced forks have a high-speed compression (HSC) adjustment. HSC starts to work when the pressure rises too high for the LSC valve. This happens on square edged hits, when the shock or forks shaft speed increases rapidly.
Compression setup
As a rule of thumb, the less compression damping you can get away with, the more comfortable your bicycle feels. Unlike motorcycles, bikes have less sprung mass. Therefore you’ll do the most work on compressing the shocks on an impact. More work for you means a harsher ride. Also, with less compression damping, the higher frequency impacts negatively affect your body while riding.
Rear Shock
We have designed Pole bikes so that the recommended sag for the shock is 30%. As described previously in the Fork section, sag is how much your fork/shock sinks into its travel by having your body weight on it. All rear shocks have a rubber o-ring around their stanchion tube which is used as a travel indicator. Coil shocks have a larger bumper rubber, which helps if your shock bottoms out.
Some examples: RockShox uses a red rubber o-ring. RockShox also has the measurements in the shock stanchion. EXT has a wider yellow bumper rubber which is also used as a travel indicator. With EXT, you need to estimate the 30% sag or measure it with tape. Cane Creek uses a similar system to RockShox with a black rubber o-ring. Again, you need to estimate the 30% sag or measure it with a tape measure like the EXT shock.
The basics of setting up the sag are the same with all shocks; Slide the travel indicator against the damper. There are many other adjustments to your shock other than the travel indicator in most cases. Usually, there is at least a rebound damping adjustment. At this point, we suggest that you either open all the adjustments or leave them set in the middle. The only exception is if your shock has a three-stage switch to select the lock-climb-open mode. To set the sag you must put the shock in open mode.
-
- Sit on your saddle and carefully lift your feet for a second to put your whole weight on the bike. Try not to bounce when doing this
-
- If the travel indicator shows that the sag is over 30%, you will need to add more pressure to your shock. In the case of a coil, you should replace it with a stiffer rating spring.
Saddle
Your saddle position depends on your riding style.
Position on the rails. If you ride uphills mostly, your saddle should be adjusted as far forward on the rails as possible. If you ride on flat sections, you want your saddle moved slightly further back to get better balance for pedaling. If you want a more upright posture for ergonomic reasons, push the saddle forwards.
Saddle angle. If you ride only lift-assisted trails, the saddle nose angle should be pointing upwards more. The reason for this is that your bike points downhill for the vast majority of the ride, and you want to be able to sit on a level saddle. If you ride flat trails, your saddle should be parallel to the ground. If you ride up and down mountains mostly, your saddle nose angle should be pointing downwards slightly. When climbing, this helps save energy by keeping your position on the saddle level.
If you ride very steep sections, it helps if you lower the seat 20-30mm from your ideal pedalling position height.
Handlebar
When your seat is positioned correctly, handlebar height determines how much your body weight is distributed to the front wheel. If you feel that your front end is too light and the steering feels twitchy when ascending, remove one 5mm spacer at a time from under the stem on the steerer tube to the top of the stem. For some riders, it helps to move the handlebar higher to get more grip to the front wheel. If your riding style is more rear balanced, lifting the bars can give you more pressure on your front wheel due to better weight distribution. This is a good indicator for the right handlebar height for descending. The more upright you can stand without losing traction on the front wheel, the better. Make sure that your handlebar’s backsweep is also pointing in the right direction. The most common mistake is to turn the handlebars so that the backsweep becomes upsweep. Instead, the handlebars should be set horizontally towards your body.
Levers and Triggers
Check your brake lever position. You should be able to reach the levers with your index fingers. The brake levers can be moved along and rotated around the handlebars, and the lever’s ‘reach’ can be adjusted with a tool or by hand. The brake lever position depends on riding style and hand size. The brake levers should be adjusted level to the ground more than pointing downwards. Adjusting your levers right helps your arms relax and shifts your weight from the front of the bike when braking on descents.
Riding
| Operating temperature of the bike is between -5 to 40 °C. Li-Ion batteries may degrade or cause hazardous outside this temperature range. | |
| Maximum system weight for Pole Voima is 150 kg (bike rider and equipment). |
E-Bike Operation
Voima’s electrical assistance works when pedalling up to 25 km/h (20mph US/CAN, 15.5mph UK, 32km/h New Zealand). Walk assistance is available up to 6 km/h. E-Bike features are operated using the Bosch LED Remote. You can choose the desired assistance level using the remote. After turning on the system, the motor assists you when pedalling.
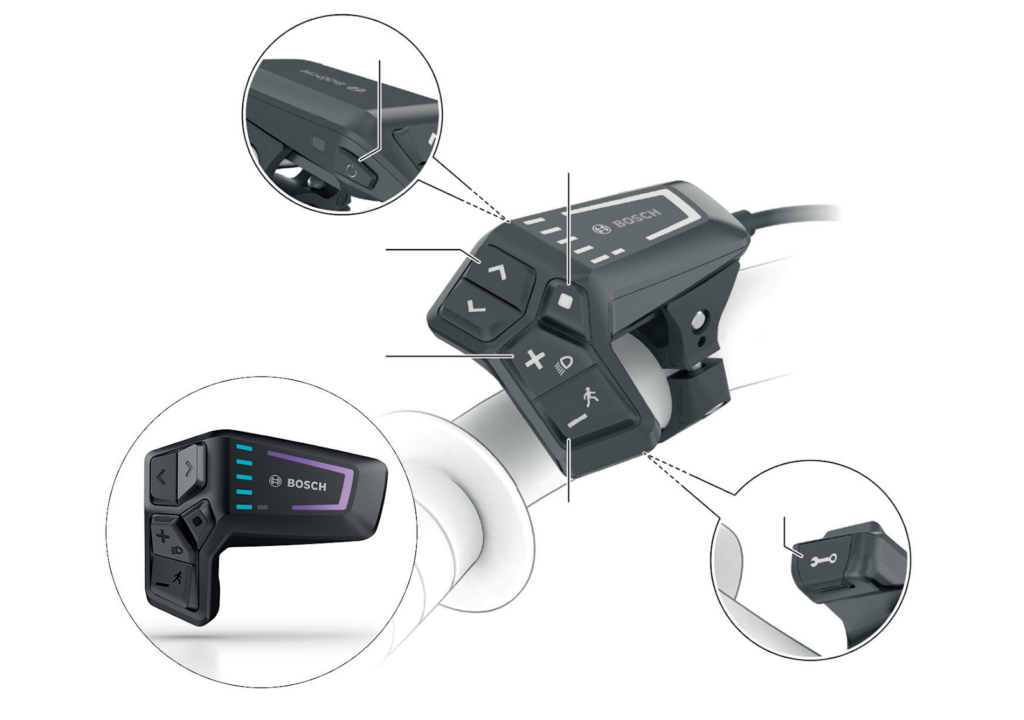
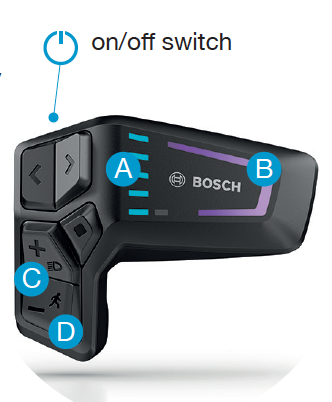
LED Remote
-
- On/off button
-
- Battery charge indicator LEDs
-
- Assistance level LEDs
-
- Increase and decrease assistance level + lights and walk assistance
-
- Brightness control + left and right
-
- Select/confirm button
-
- Diagnostics connection and charging port for the remote
How to operate the Bosch system
Switch on the system using the power button at the top of the LED display
The motor will engage when you pedal
-
- LED lights show the battery charge level
-
- LED light shows the assisted riding mode you are in
-
- use the + / – buttons to select one of the assisted riding modes
-
- For walk assistance hold down & move eBike after one second
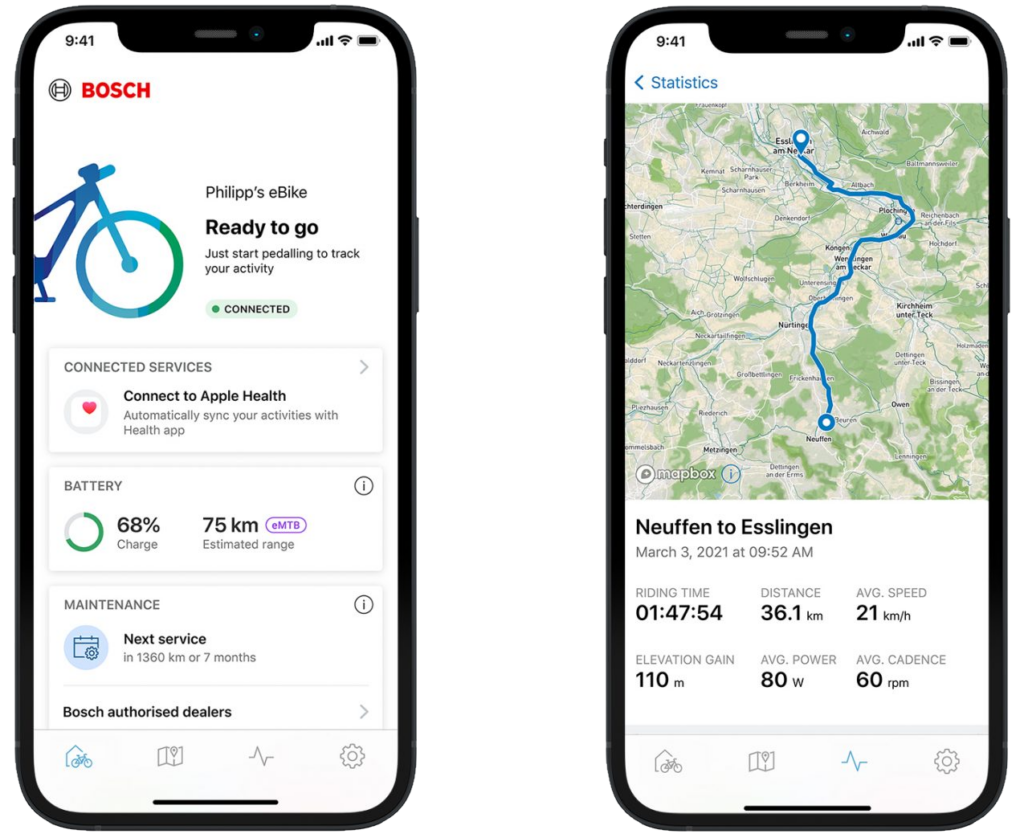
Mobile Application
Bosch eBike Flow app for Android and iPhones allows you to connect and get stats from your Voima. Check Google Play Store or Apple App Store to download this application. Do not use your phone when riding. Stop if you need to use the application.
Normal Operation
Before riding, check the bike visually, check tire pressures and test the brakes and suspension for any odd behaviour. Be careful especially when braking, turning, at high speeds or jumping.
Check your component manufacturer for instructions on proper usage.
| Do not use child-seats, bicycle trailers or trailer bicycles with the Pole Voima. | |
| Study usage of your quick-release pedals if used. Note that in unexpected events these pedals can cause you to fall more easily. | |
| Bike components, such as brakes, can reach high temperatures when riding. Be careful when touching the components after a ride. |
Charging and Battery Handling
| Battery temperature during charging must be between 0 – 40 °C. Li-Ion batteries may degrade or cause hazards outside this temperature range. |
Charging can be done either by connecting the Bosch 4A Charger to the bike’s charging plug or removing the battery from the frame and charging it separately. Charging time from empty to full is approximately 6 hours. It is recommended not to keep the battery connected to the charger for long periods of time. To get the best out of your battery store it in under 30°C (preferably between 10 to 20°C). The optimal charge status of long storage is between 30 to 60% battery charge.
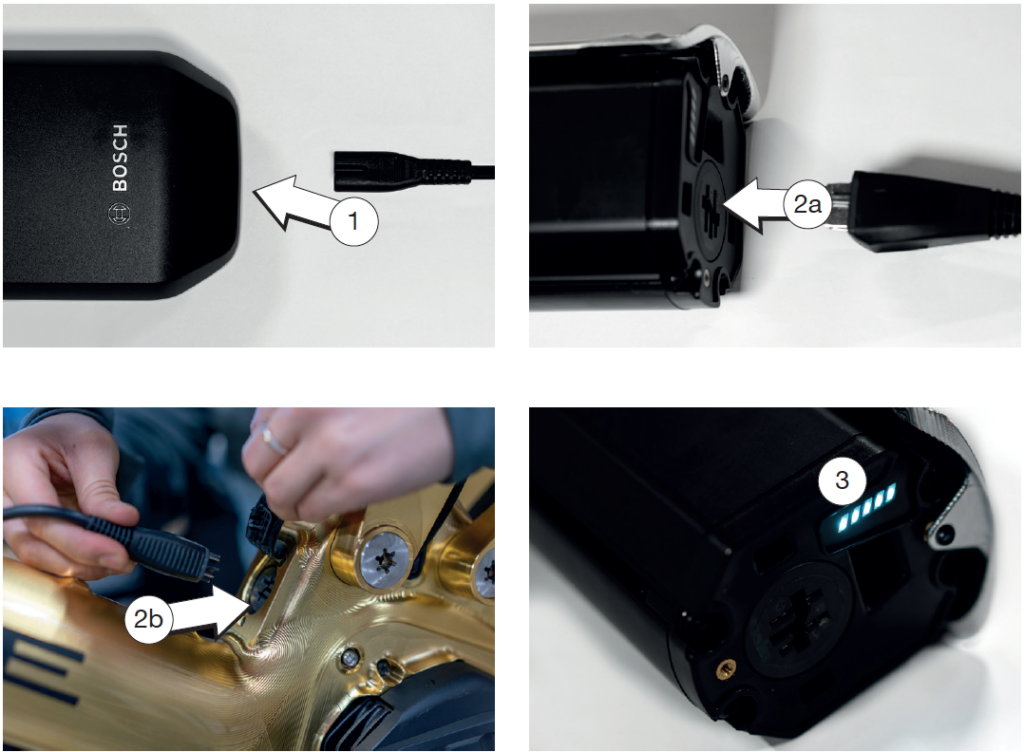
Charging the Battery
-
- Plug the power cord to charger and outlet
-
- Plug the power plug into
-
- the battery
-
- or the frame
-
- Plug the power plug into
-
- When all LEDs are lit battery is fully charged
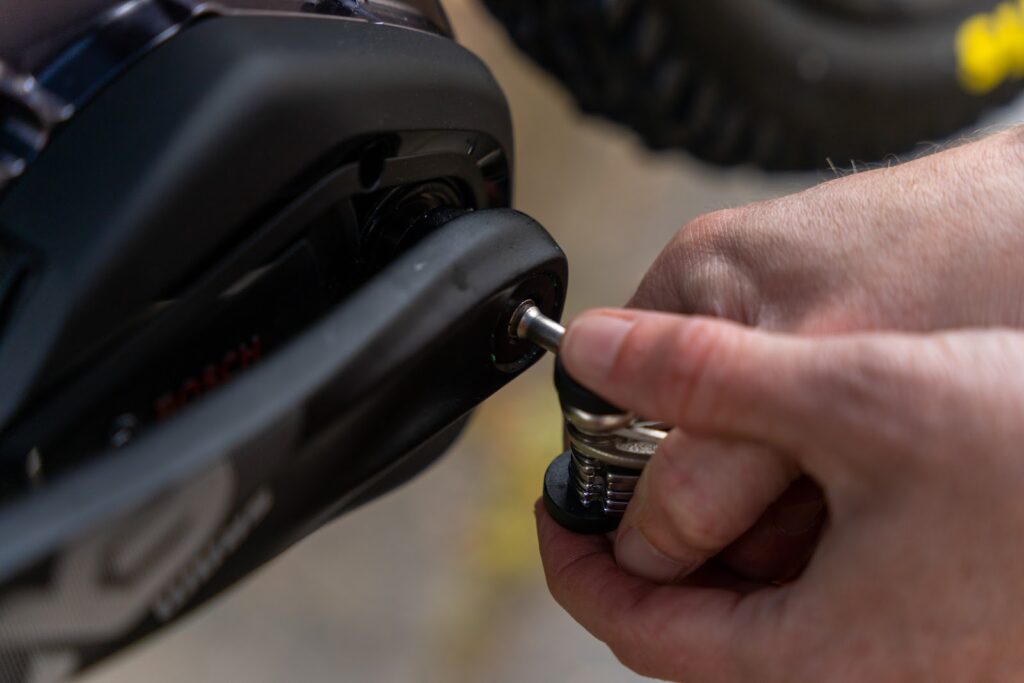
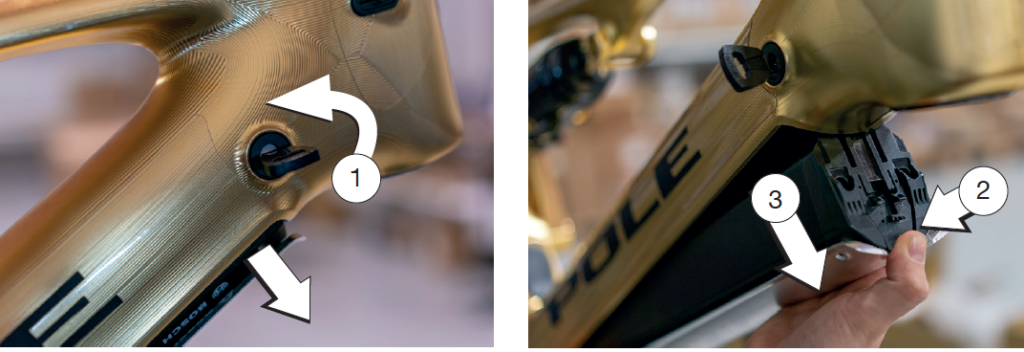
Removing the Battery
-
- Open the lock using the key
-
- Press safety restraint to release the battery
-
- Pull the battery out of the frame, don’t let it fall!
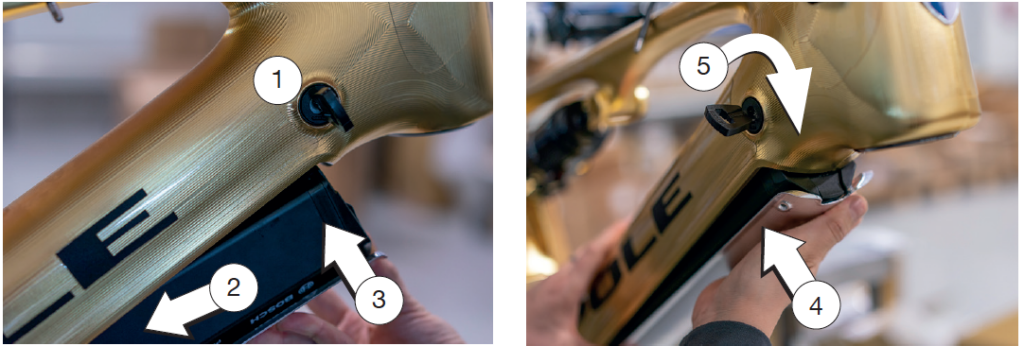
Installing the Battery
-
- Ensure that lock is in open position
-
- Place lower end of the battery to the lower holder
-
- Push the battery upwards until held by the safety restraint
-
- Holding the lock open press the battery upwards until it clicks
-
- Close to lock an secure the battery and remove the key
Maintenance
| Always remove the battery during maintenance except when cleaning. | |
| Do not use repair stands or other equipment to clamp your frame. Lift and hang the bike from the handlebars and saddle. | |
| Never use high heat on the frame. It may damage the electrophoretic coating or adhesive. | |
| Do not tamper with electrical components.Contact Pole Bicycles support or experienced bikes shop for assistance. |
Cleaning After Riding
After every use of the product, we recommend a thorough wash using generous amounts of clean water. After washing, clean your bicycle with a soft cloth and a bicycle cleaner or a solution of soap and water. Do not use industrial solvents or harsh chemicals that can damage the coatings and surfaces, or moving parts.
Do not aim high-pressure water directly at bearings, suspension components or stickers.
Periodical Maintenance
Bicycle service requires special knowledge and tools and should be performed by a professional bicycle mechanic. This user manual is to be used in conjunction with the manuals supplied by the component manufacturers. If you did not receive the manual provided by the component manufacturer, you can download the materials from the Internet or contact your professional mechanic. Consult your professional mechanic to create a maintenance plan and refer to the Maintenance Schedule as a guide for frequent inspection, service, and replacement of parts.
Maintenance Schedule
This list provides some guidelines on maintenance but is not to be considered a complete inspection. Following these guidelines will help maintain the performance of your bicycle and prevent more serious problems from arising. It is important to remember that service intervals can vary depending on climate, trail conditions, and riding frequency. For service instructions for your specific components, visit the manufacturer’s website. If you detect any problems with your bike, and you are not able to repair them, take your bike to your authorised mechanic for service.
Bosch Annual Check-Up
Have your e-bike system checked by an expert at least once a year, including mechanical parts, and to check that the system software is up-to-date.
Before Every Ride
-
- Check the frame and fork for signs of stress:
-
- scratches, cracks, dents, deformation or discoloration. Inspect the chainstay guard and ensure it is correctly and securely attached
-
- Check the frame and fork for signs of stress:
-
- Check that the wheels are true
-
- Check the tire pressure
-
- Check the brakes, including brake pads and brake lines
-
- Check that both wheels are secure
-
- Check that the handlebar and stem are correctly positioned and inspect for signs of stress: scratches, cracks, dents, deformities, and discoloration
-
- Check that the suspension settings are right for you
-
- Check that the lighting system and reflectors are in good working order
-
- Check that the saddle and seatpost are correctly positioned and tightened
-
- Check for smooth shifting operation
-
- Lubricate the chain
Weekly
-
- Check that all bolts are tightened to proper torque specifications. Make sure to include pedals and any accessories or luggage carriers.
-
- Check frame linkage axles tightening torques
-
- Check the rims and spokes for damage
-
- Clean the bicycle
-
- Check the tires for damage and wear
-
- Clean dust seals on suspension
Monthly
-
- Check the shifter and brake cables for wear
-
- Check that the bottom bracket is tightened to the proper torque specifications
-
- Check that the headset is adjusted correctly
-
- Check that the chain is tensioned correctly
-
- Check the chainstay guard and bottom bracket guard (if applicable) for wear
-
- Check the brake pads thickness
Every Three Months
-
- Inspect the drivetrain for wear
-
- Inspect the crank arms and pedals
-
- Check tire sealant levels
-
- Inspect suspension parts for wear
Annually
-
- Annual servicing at your dealer: overhaul service and inspection of the frame, suspension, and all other components. Repair, service, and/or replace parts as needed
-
- Clean and lubricate all parts as recommended by your component manufacturer’s instructions or consult your dealer
-
- Check for service instructions and intervals for your frame at www.polebicycles.com
| All components are subjected to wear and high stresses. Materials and components may react to wear or stress fatigue in different ways. If thedesign life of a component has been exceeded, it may fail causing injuries. | |
| Any form of crack, scratches or change of colouring in highly stressed areasindicate that the life of the component has been reached and it should bereplaced. | |
| Use only genuine replacement parts!preferably using identical parts when replacing worn or broken parts. |
Most parts have product identification information and more details can be found in this manual, refer to chapter ‘Components’. If unavailable or you have additional questions contact our support for more details at helpdesk@polebicycles.com.
Gear Adjustment
Typically gear adjustment is not commonly needed, with a new bike there might be more frequent need. Typically it is needed to adjust only cable tightness as it sets and stretches over time. Cable is adjusted from the trigger end on the handlebar. Small adjustments of 0.5-1 turns is usually sufficient.
With Sram AXS shifter, press and hold the AXS button underside the shifter and simultaneously press the paddle downwards, or upwards to make an adjustment.
Check the manufacturer manuals and website for more information on adjustment on low and high limit screw adjustments. Check your local bike shop or Pole support for further recommendations.
Brake Maintenance and Pad Replacement
Inspect disc brake pads for wear every month. When the thickness of the backing plate and pad material is 3 mm or less, they are worn and need to be replaced with new disc brake pads. If you notice any impared performance, sticking brakes, or non-typical noise check brakes. Contact your local bike shop, manufacturer manuals or Pole support for further information.
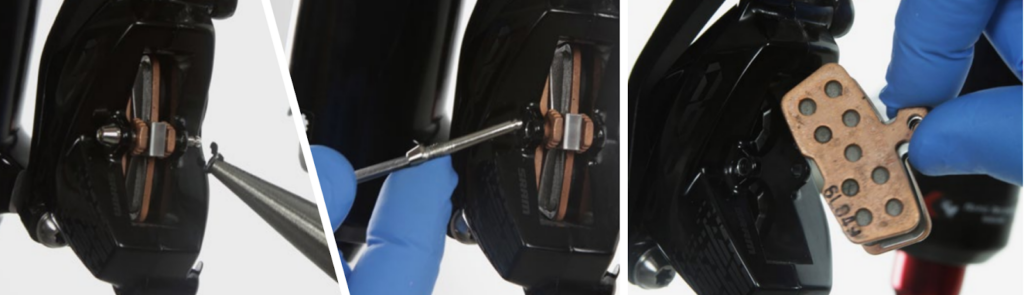
Pad Replacement
-
- Remove wheel
-
- Remove pin with needle pliers
-
- Remove pad retention bolt from the caliber with 2.5mm allen key
-
- Remove the brake pads and pad H-spring from the caliber
-
- Push pistons back with a soft tool
-
- Install new pads and spring
-
- Install pad retention bolt with 2.5mm allen key
-
- Insert safety pin
-
- Install wheel and test drive
Handlebar and Stem
Check rigidness and tightness of the handlebar and surrounding components. They are critical to ensure proper steering and braking performance.
Wheelset
| Check wheels visually for any cracks or deformations. If the wheel isn’t true or there are loose spokes contact your local bike shop for assistance. |
Spare Parts
| Use only genuine replacement parts!Prefer using identical parts when replacing worn or broken parts. |
Most parts have product identification information and more details can be found in this manual, refer to chapter “Components”. If unavailable or you have additional questions contact our support for more details.
Incidental Damage
Do not let your bicycle fall. Do not set your bicycle down with the frame or derailleur touching the ground. Use care with car racks and work stands. Clamping devices, such as those found on a work stand or car carrier, can cause damage to the paint or tubes of bicycle frames. To hold the bicycle for repairs, clamp the seatpost. To hold the bicycle for transportation on a motor vehicle, clamp the bicycle by the wheels or fork. If you accidentally apply a bending force to the fork, do not ride the bicycle until your retailer has inspected the fork for damage. The finish, or paint, on your bicycle can be damaged by chemicals (including some sports drinks) or abrasive contact. Dirt can scratch or remove paint (and even frame material), especially where a cable rubs or a strap is placed around a tube. Keep the bicycle clean. Use adhesive tape to prevent rubbing in critical spots.
Transport
When packaging your bicycle for travel, use a hard case or carton that will protect it from damage. Attach padding to all of the frame and fork tubes. Use a rigid block to protect the fork tips and maintain structural support of the fork lowers. If the bicycle is not packaged correctly, it could be easily damaged in transit. If you are not sure, ask your local bicycle accessory or service retailer to package your bicycle for you.
For our travels, we use EVOC BIKE TRAVEL BAG PRO.
| Travelling with an E-Bike on plane might be limited or require special attention.Contact your flight carrier for detailed information. |
Storage
Store your bicycle in a dry shelter where it will not be an obstruction and has protection from dangerous conditions. Do not park your bicycle near electric motors; ozone from motors can damage rubber and paint. Rain, salty water or snow can cause the metal on your bicycle to corrode. Ultraviolet radiation from the sun can fade the paint and crack the rubber or plastic on your bicycle. Before you put away your bicycle for an extended time, clean and service it. Hang your bicycle off the ground with the tires at approximately half the recommended inflation pressure. Before you ride your bicycle again, be sure it operates correctly.
| Storage temperature should be between 10 and 20 °C to keep the batteryand the electrical system in pristine condition. |
Recycling And Regulatory Information
Battery and Electrical Components
Do not dispose of batteries, chargers or other electrical components in household trash! Check your local regulations on recycling the items.
Frame
Frame is AW-7075 aluminum with a thin layer of electrophoretic clear coat. Check your local regulations and recommendations on recycling aluminum. Bearings and bushings also contain steel and other materials.
Components
Most bicycle components have high metal content and can be recycled as metal. Check your local regulations on any restrictions and recommendations.
Tires and Inner Tubes
Check your local regulations and availability for recycling bicycle tires.
Regulatory information
We hereby declare that products by Pole Bicycles Oy fulfill the requirements of the RoHS directive 2011/65/EU including amendments by directive 2015/863/EU.
Our products also fulfill the requirements of the REACH regulation 1907/2006/EY and they do not contain Substances of Very High Concern (SVHC).
Declaration of Conformity

Manufacturer Pole Bicycle Company Oy
Punasillantie 30 A
FI-40950 Muurame
Finland
Declares following products
Product description Electrically Power Assisted Cycle
Model Voima E-Bike
To fulfill the following European directives as applicable
-
- 2006/42/EC on machinery
-
- 2014/30/EC on the electromagnetic compatibility
-
- 2011/65/EC on RoHS
-
- 2014/53/EU on radio equipment
The following standards were applied as relevant
-
- EN 15194 on electrically power assisted cycles
-
- EN 17404 on EPAC Mountain bikes

Leo Kokkonen (CEO)
Pole Bicycle Company Oy, 40950 Muurame, Finland
Date 2022-03-15


